시작하기 전에 앞서
이전 포스트에서 Janus를 Javascript 모듈로 제공한다고 언급한 적이 있으며 이에 대한 사용 방법을 Documentation으로 제공한다고 언급한 바 있습니다.
이번 포스트에서는 Documentation에서 제공하는 내용들을 학습했다는 가정 하에 설명하기 때문에 자세한 설명이 존재하지 않을 수 있습니다. (도중 이해가 안가시는 부분이 존재하신다면 [WebRTC] Janus REST API 활용법 (tistory.com) 포스트로 이동해 정리된 노션을 확인하시거나 공식 Janus Documentation을 통해 확인하실 수 있습니다.)
그리고 기존에 진행 중이던 React 프로젝트를 토대로 설명하기에 프로젝트의 설정부터 진행하지 않는다는 부분을 알아주셨으면 좋겠습니다.
그리고 이 포스트에서는 전체적인 소스 코드를 다루지 않고 전체적인 흐름을 토대로 구현하였는지에 대해 다루고 있으니 추가적인 구현에 대한 부분은 Janus에서 제공하는 Demo 웹페이지에서 구현된 소스코드를 참고하시면 좋을 것 같습니다.
Janus.js, Config.js
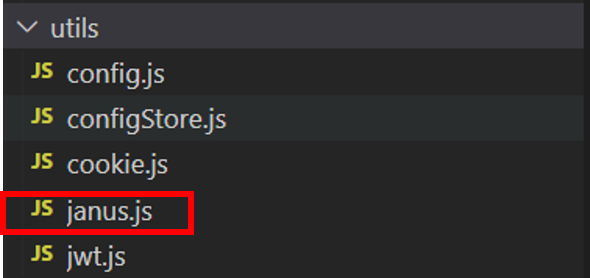
Janus를 Javascript로 이용하기 위해 Janus에서는 js파일을 Git에서 다운받아 사용할 수 있게 제공해준다.
먼저 이를 meetecho/janus-gateway: Janus WebRTC Server (github.com) 에서 받아와 React 패키지 안에 담아준다.
그리고 janus.js안에 필요한 의존성들이 존재하는데 이를 설치해주면 된다.
설정이 완료되었다면 실제로 Janus와 통신을 할 수 있게 Janus Server의 주소를 저장해야한다.
그리고 방을 생성하고 방의 목록을 조회해야하기에 백엔드 주소도 저장해야한다.
이에 대한 두 주소를 담아두기 위해 Config 파일을 따로 구성하여 저장해두었다.
export const janusServer = "http://localhost:8088/janus";
export const spring_server = "http://localhost:8080";- server - Janus General Server
- spring_server - Spring 서버 (백엔드)
VideoPage
실제 화상회의를 구성하는 페이지이다.
이 페이지는 VideoComponent를 조립한 페이지로 화상회의에 대한 상세한 부분은 VideoComponent에서 구현한다.
import VideoComponent from '../Components/Videos/VideoComponent'

const VideoPage = () => {
    return (
        <div>
            <VideoComponent />
        </div>
    )
}

export default VideoPage;
VideoComponent
init
VideoComponent에 실제로 Janus와 통신하는 과정이 포함되어있다.
우리는 페이지가 렌더링이 됨과 동시에 PeerConnection 협상이 진행하고 이에 대한 처리들이 완료되어야 원만한 화상회의를 진행할 수 있기 때문에 useEffect를 활용해 처음 렌더링이 시작될 때 Janus 로직이 실행될 수 있도록 하였다.
다음 ...에 Janus 로직이 들어갈 것이다.
useEffect(() =>  {
    ...
});
먼저, 우리는 Janus를 초기화하기 위해 init 메서드를 이용한다.
Janus.init({
   debug: true,
   dependencies: Janus.useDefaultDependencies(),
   callback: function() {
           // Done!
   }
});
세션 생성
Janus가 초기화되었다면 Janus Server와 통신할 수 있도록 실제 세션을 생성해한다.
Janus 세션을 생성하는데 있어 new 생성자를 이용하면 된다.
세션을 생성하는데 있어 미디어 서버의 주소를 입력해준다.
실제로 세션을 생성하는 부분을 살펴보면 다음과 같다.
// Janus Server
import { janusServer } from "../../utils/config";

var janus = new Janus(
    {
        server: janusServer,
        success: function() {
        },
        error: function(cause) {
        },
        destroyed: function() {
        }
    });
Janus 세션을 생성함에 따라 이에 대한 성공, 에러, 파괴에 대한 콜백을 설정할 수 있는데 이는 잠시 후에 살펴보도록 하고 실제 HTTP 통신으로 Request를 보내고 Response가 오는 모습을 확인해보자.

성공적으로 완료되었을시 위와 같은 결과를 보여준다.
세션의 생성에 대한 결과로 통신할 수 있는 세션 ID를 내려주고 우리는 실제 통신을 진행할 때 해당 세션을 사용한다.
만약 실패한다면 error 콜백이 발생하고 이 부분에 대해서는 단순 로그를 출력해주었다.
그리고 세션을 사용하고 난 뒤, 파괴시킨다면 destroyed 콜백이 발생하게되고 이 부분에서 또한 단순 로그를 출력해주었다.
Plugin Attach 및 통신
가장 중요한 부분은 세션이 생성되고 난 뒤일 것이다.
이제 실제로 세션이 생성되고 난 뒤 success 콜백이 발생할 것이고 이 메소드 안에서 우리가 사용할 Plugin을 Attach해서 이를 사용할 수 있도록 만들어야 한다.
우리가 구현할 화상회의에서 필요한 Plugin은 VideoRoom Plugin으로, 이를 Attach하여 다양한 기능들을 활용해보려고 한다.
Attach는 janus.attach를 통해 쉽게 진행할 수 있으며, 요청을 하는데 있어 plugin과 opaqueId(같은 사용자에 대한 요청인 지 구분하기 위한 구분자)를 담아 진행한다.
그리고 실제 attach 성공 등에 대한 callback 메소드들이 존재하는데 이를 각각 채워주면 된다. (조금 뒤에 자세히 알아본다.)
janus.attach(
{
plugin: "janus.plugin.videoroom",
success: function(pluginHandle) {
},
error: function(cause) {
},
consentDialog: function(on) {
},
onmessage: function(msg, jsep) {
},
onlocaltrack: function(track, added) {
},
onremotetrack: function(track, mid, added) {
},
oncleanup: function() {
},
detached: function() {
}
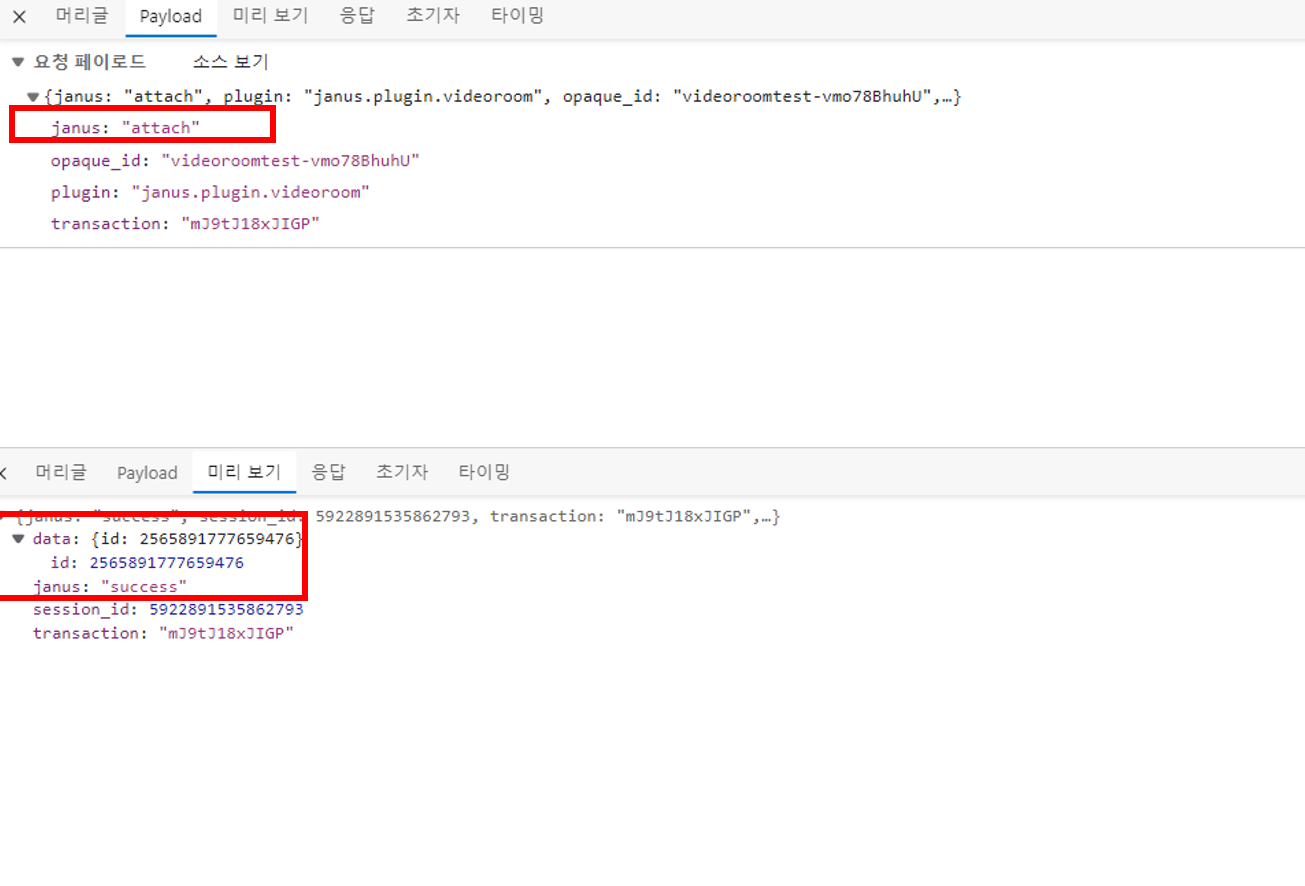
});실제로 Attach를 다음과 같이 보내게 되고 성공적으로 Attach 되면서 Plugin에 대한 id를 내려준다.
우리는 내려받은 Plugin Id를 통해 Plugin과 통신하면서 Application 로직을 구현할 수 있게 된다.
이제 Attach까지 성공했다면 해당 참가자는 VideoRoom에 대해 Publisher로서 Join하는 것에 대한 요청을 Plugin에 보내야한다.
우리가 구현하는 화상회의는 단순 1:N 스트리밍의 형태가 아니라 누구든지 미디어 정보를 공유하면서 진행되는 N:M Conference형태이다. 그렇기에 모든 참가자에 대해 Join에 대한 요청을 진행하게 된다.
이를 만족시킬 수 있도록 Success Callback을 채워주자.
플러그인은 추후에 채팅이나 파일 전송 등에 사용되기 때문에 전역 변수를 선언하고 이곳에 저장해두고 비밀번호 방인 경우에 pin을 담아 보내고 아닌 경우 pin 없이 Plugin에 Request를 보내자.
success: function (pluginHandle) {
    storePlugin = pluginHandle;

    if (pin) {
        var register = {
            request: "join",
            room: roomId,
            ptype: "publisher",
            display: username,
            pin: pin,
        };
    } else {
        var register = {
            request: "join",
            room: roomId,
            ptype: "publisher",
            display: username,
        };
    }

    storePlugin.send({ message: register });
},
실제로 Join 요청은 다음과 같이 보내게 된다.
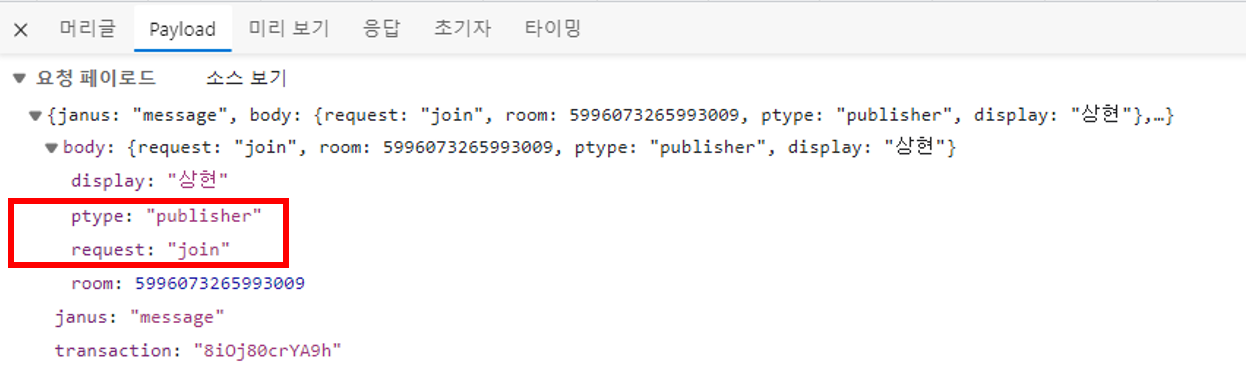
ptype을 publisher로 보내는 모습을 확인할 수 있다. (추후 subscriber로도 보내야하니 이 점에 유의하자.)
그리고 Attach에 대한 에러 발생시 발생하는 콜백인 error에서는 단순 로그를 출력한다.
 error: function (error) {
     // 에러 발생시
     Janus.error("  -- Error attaching plugin...", error);
     Janus.log("Error attaching plugin... " + error);
 },
우리가 미디어 입력 장치에 대한 사용 권한을 체크할 때 getUserMedia라는 메소드가 호출되는데 이것이 동작할 때 발생하는 콜백 consentDialog도 존재한다.
만약, 미디어 입력 장치 사용 권한에 대해 팝업이 뜨고 그 상황에서 무언가 동작하기를 원한다면 이 콜백을 이용하자.
consentDialog: function (on) {
    Janus.debug(
        "Consent dialog should be " + (on ? "on" : "off") + " now"
    );
    if (on) {
        // getUserMedia 호출되기 전
    } else {
        // getUserMedia 호출되기 후
    }
},
그리고 ICE 상태 변화시 발생하는 콜백 iceState가 존재한다. 이 부분도 딱히 큰 설정 없이 로그만 남겼다.
iceState: function (state) {
    // ICE 상태 변화시
    Janus.log("ICE state changed to " + state);
},
그리고 미디어 정보를 실제로 받기 시작하거나 중지할시 발생하는 콜백 mediaState가 존재하는데 이 부분 또한 로그만 남겼다.
  mediaState: function (medium, on) {
      // Media 정보를 받기 시작하거나 중지할시
      Janus.log(
          "Janus " +
          (on ? "started" : "stopped") +
          " receiving our " +
          medium
      );
  },
그리고 WebRTC PeerConnection이 활성화되거나 끝날 때 발생하는 콜백 webrtcState가 존재하는데 이 부분도 로그만 남겼다.
webrtcState: function (on) {
    // ICE, DTLS를 포함한 모든 것이 성공하여 PeerConnection이 활성화 => true
    //PeerConnection이 죽는다면 파라미터가 false
    Janus.log(
        "Janus says our WebRTC PeerConnection is " +
        (on ? "up" : "down") +
        " now"
    );
    if (!on) {
        return;
    }
},
그리고 실제로 Plugin으로부터 메세지가 도착할 때 발생하는 콜백 onmessage가 존재한다.
이 부분은 중요하기에 주의깊게 봐야한다. (우리가 실제 로직들을 구성하는데 있어 필요한 부분들이 모여있다.)
메세지는 videoroom이라는 Key에 Value로 어떤 메세지가 도착했는지 구분할 수 있다. (아래 Joined처럼 plugindata => data => videoroom이라는 key를 구분자로 메세지를 구분한다.)
먼저 Joined을 살펴보자.
실제로 Joined Response가 날아오면 다음과 같다.
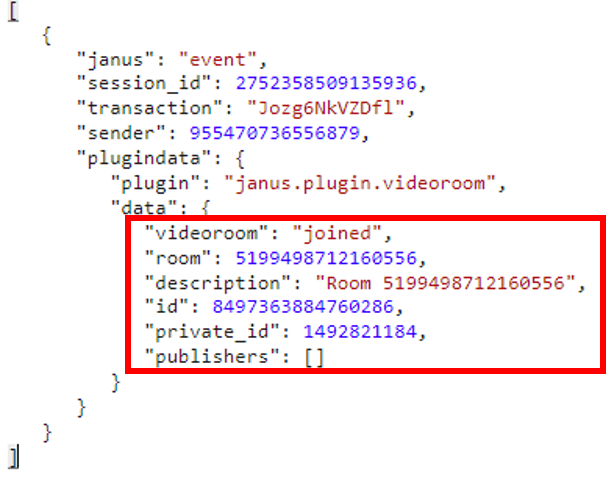
여기서 room은 roomId를 의미하고 id는 Publisher의 id를 의미하고 private_id는 추후 subscribe를 진행할때 사용되는 비밀 id이다.
publishers는 이미 기존 방에서 publish하고 있던 참가자들에 대한 목록을 주게되는데 비어있는 화상회의 방에 입장한 상태이기에 이 부분은 비어있다.
우리는 Publisher로서 진행한 Join 요청에 대해 성공한다면 Joined를 받게 되는데 Join에 성공하면 해당 참가자는 성공적인 참가자로 분류될 수 있으므로 참가자 명단에 추가해야한다.
추가할 정보는 위에서 언급한 room, id, privateId 3가지 이다.
추가한 정보의 기준은 방의 구분자, Publisher의 구분자, 추후 다른 참가자가 해당 Publisher를 Subscribe하기 위한 구분자로서 필요한 3가지를 저장했다.(이 부분에 대해서는 Redux를 활용해 Action을 Dispatch해서 저장해주었다.)
실제 Plugin의 직접적인 기능 사용은 PeerConnection 협상이 완료된 후에 가능하다.
우리는 Plugin과의 즉시 기능을 사용하길 원하기에 즉각적인 협상을 원한다. 따라서, publishOwnFeed 메소드를 활용해 바로 Plugin과 PeerConnection 협상을 바로 진행한다.
그리고 Publish하고 있는 Publisher들(response에서 publishers)이 존재한다면 해당 Publisher들에 대해 Subscribe를 진행해 해당 영상 정보들을 받아올 수 있도록 한다.
이는 newRemoteFeed를 통해 진행한다.
실제 코드는 아래와 같다.
if (event === "joined") {
    // Publisher가 Join시 WebRTC와 협상하거나 존재하는 피드에 연결
    dispatch(
        joinRoom({
            room: msg["room"],
            publisherId: msg["id"],
            display: username,
            publisherPvtId: msg["private_id"],
        })
    );

    Janus.log(
        "Successfully joined room " +
        msg["room"] +
        " with ID " +
        id
    );

    // SDP offer과 Publisher로 등록 진행
    publishOwnFeed(true);

    // 다른 Publisher들이 존재할시
    if (msg["publishers"]) {
        var list = msg["publishers"];
        Janus.debug(
            "Got a list of available publishers/feeds:",
            list
        );
        for (var f in list) {
            var id = list[f]["id"];
            var display = list[f]["display"];
            var audio = list[f]["audio_codec"];
            var video = list[f]["video_codec"];
            Janus.debug(
                "  >> [" +
                id +
                "] " +
                display +
                " (audio: " +
                audio +
                ", video: " +
                video +
                ")"
            );
            // 모두 Subscribe 진행
            newRemoteFeed(id, display, audio, video);
        }
    }
}
이제 위에서 설명한 publishOwnFeed와 newRemoteFeed를 살펴보자.
먼저, publishOwnFeed에 대해 알아보자.
이전 WebRTC 포스트들에서 언급했듯이, 협상을 위해서는 SDP Offer-Answer 모델을 활용해 서로 교환해야한다.
Janus는 이를 메소드로 제공해주기에 우리는 단순 이를 사용하기만 하면 된다.
SDP는 미디어에 대한 정보를 요구하므로 이에 대한 정보들을 채워주자.
Data Channel을 사용할 것이고, Publisher는 비디오와 오디오 정보를 보내기만 하고 받지는 않는다. (따로 Subscribe를 통해 전달받기 떄문에 필요 없다.)
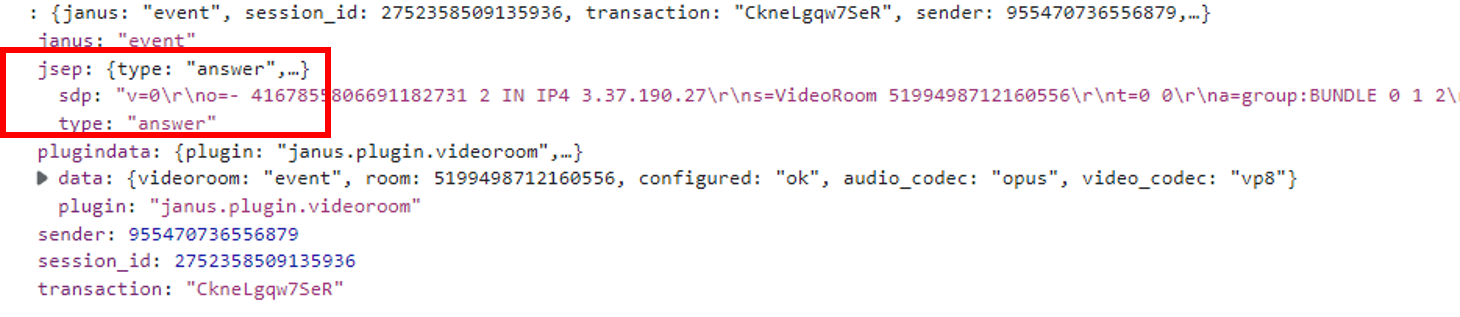
생성이 성공적으로 완료된다면 Plugin에 실제로 publish한다는 사항(configure로 publish 메세지를 시작할 수 있으며 기본적으로 비디오와 오디오를 켜진 상태로 진행)과 jsep를 담아 보내면 된다.
JSEP란 JavaScript Session Establishment Protocol의 약자로 Peer 간에 Offer와 Answer을 교환할 것을 요구한다.
SDP는 Offer-Answer 모델을 따르고 있기 때문에 JSEP를 이용해 서로간의 SDP 정보를 교환하면 된다.
그렇기에 Janus의 CreateOffer는 JSEP를 생성해 이를 가능하게 해주는 것 같다.
실제로 요청을 보내는 것은 다음과 같다.

우리가 위에서 언급한 형태로 Request가 잘 날아가는 모습을 확인할 수 있다.
그리고 Janus로부터 이에 대한 응답으로 SDP Answer가 도착한 모습을 확인할 수 있다.
위의 설명들을 구현한 코드는 아래와 같다.
const publishOwnFeed = (useAudio) => {
    storePlugin.createOffer({
        // DataChannel 사용, Publisher는 전송만 진행하고 수신은 Subscriber에서 진행
        media: {
            data: true,
            audioRecv: false,
            videoRecv: false,
            audioSend: useAudio,
            videoSend: true,
        },

        success: function (jsep) {
            Janus.debug("Got publisher SDP!", jsep);
            var publish = {
                request: "configure",
                audio: useAudio,
                video: true,
            };

            // SDP Offer 생성 완료 후, Publish 메세지와 jsep를 담아 Plugin에 전송
            storePlugin.send({ message: publish, jsep: jsep });
        },
        error: function (error) {
            // 에러 발생시 재시도
            Janus.error("WebRTC error:", error);
            publishOwnFeed(useAudio);
        },
    });
};
그리고 newRemoteFeed를 살펴보자.
이곳에서는 Publisher에 대한 Subscribe 요청을 진행하는 Plugin을 Attach해서 비디오, 오디오 정보를 받아올 수 있도록 한다.
Attach에 대한 부분은 위에서 언급했으므로 생략하고 Attach가 성공했을시의 로직을 살펴보자.
전반적으로 Publish할 때의 로직과 비슷한데 ptype이 subscriber로 바뀐 것에 주의하자.
Publisher로서 해당 Plugin을 Join하는 것이 아니라 Subscriber로서 Join하는 것이다. (목적이 수신하는 것임을 주의)
그리고 실제로 Subscribe 요청을 보내면 된다.
만약 정상적으로 처리가 된다면 해당 Plugin에서는 attached라는 반환과 함께 Offer가 같이 날아올 것이다. (잠시 후 알아본다.)
실제 코드는 아래와 같다.
success: function (pluginHandle) {
    remoteFeed = pluginHandle;
    Janus.log(
        "Plugin attached! (" +
        remoteFeed.getPlugin() +
        ", id=" +
        remoteFeed.getId() +
        ")"
    );
    Janus.log("  -- This is a subscriber");

    let subscribe = null;
    if (pin) {
        subscribe = {
            request: "join",
            room: roomId,
            ptype: "subscriber",
            feed: id,
            pin: pin,
            private_id: publishFeed.pvtid,
        };
    } else {
        subscribe = {
            request: "join",
            room: roomId,
            ptype: "subscriber",
            feed: id,
            private_id: publishFeed.pvtid,
        };
    }

    // Subscribe 메세지를 담아 Plugin에 전송 (Plugin 측에서 Offer를 생성하여 전송해줌)
    remoteFeed.videoCodec = video;
    remoteFeed.send({ message: subscribe });
},
에러에 대한 콜백이다. (이 부분에 대해서는 위에서도 언급했으니 생략하겠다.)
error: function (error) {
    Janus.error("  -- Error attaching plugin...", error);
},
그리고 중요한 메세지에 대한 콜백이다.
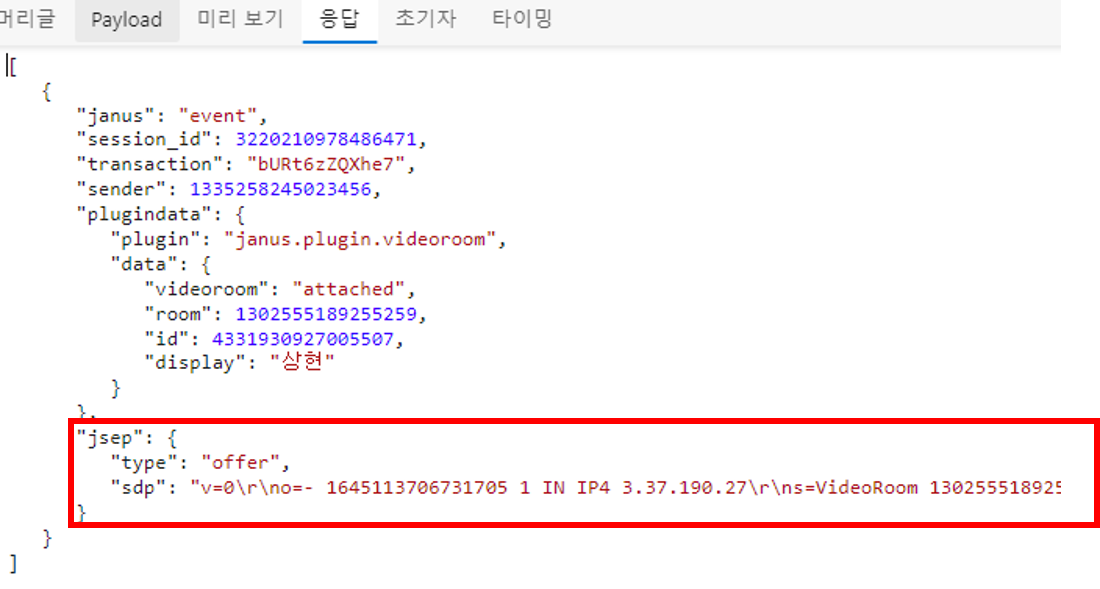
먼저 attached에 대해서 살펴보자.
위에서 언급한대로, attach에 성공한다면 attached라는 결과와 함께 Offer가 함께 날아올 것이다.
여기서 Response에 대한 부분은 joined와 비슷하다.
room은 roomId를 의미하고 id는 Publisher의 id를 의미하고 private_id는 추후 subscribe를 진행할때 사용되는 비밀 id이다. (publishers는 이미 기존 방에서 publish하고 있던 참가자들인데 현재는 혼자 들어가있는 상황이라 비어있다.)
이 attached라는 결과는 Publish 중인 참가자에 대한 Subscribe하는 Join 요청이 성공적으로 이루어졌다는 뜻이므로 내가 해당 참가자의 Subscribe에 성공했다는 뜻과 같다.
그러므로 위에 했던 것처럼 Subscribe 정보들에 대해서 따로 저장해주자. (이때도 Redux를 활용하였다.)
그리고 simulcast를 사용할 시 event라는 메세지라는 메세지가 오기에 이런 부분에 대한 처리를 진행할 수 있지만 지금 당장은 사용하지 않으므로 처리해주지 않았고 그 이외에도 따로 처리해주지 않았다.
마지막으로 처음 attached하여 Subscriber로서 참여를 하게 되었을 시에는 Offer가 함께 오는데 이에 대한 Answer를 생성해서 전해줘야한다.
이를 구성하는데 있어서 이는 단순 수신을 위한 Plugin이기 때문에 수신만하고 송신은 진행하지 않는다.
이는 Offer를 작성할 때와 같이 작성해주고 Plugin에 요청을 보내면 된다.
아래는 위에서 설명한 부분에 대한 코드들이다.
onmessage: function (msg, jsep) {
    Janus.debug(" ::: Got a message (subscriber) :::", msg);
    var event = msg["videoroom"];
    Janus.debug("Event: " + event);
    if (msg["error"]) {
        console.log(msg["error"]);
    } else if (event) {
        if (event === "attached") {
            remoteFeed.rfid = msg["id"];
            remoteFeed.rfdisplay = msg["display"];
            dispatch(
                subscribeFeed({
                    id: msg["id"],
                    display: msg["display"],
                })
            );
            Janus.log(
                "Successfully attached to feed " +
                remoteFeed.rfid +
                " (" +
                remoteFeed.rfdisplay +
                ") in room " +
                msg["room"]
            );
        } else if (event === "event") {
            // publisher로부터의 동시캐스트를 사용할 시 사용 (현재 사용 X)
        } else {
            // What has just happened?
        }
    }
    if (jsep) {
        Janus.debug("Handling SDP as well...", jsep);
        // Answer and attach
        remoteFeed.createAnswer({
            jsep: jsep,
            // Audio와 Video를 보내지 않는다.(전송은 Publisher)
            media: {
                data: true,
                audioSend: false,
                videoSend: false,
            },
            success: function (jsep) {
                Janus.debug("Got SDP!", jsep);
                var body = { request: "start", room: roomId };
                remoteFeed.send({ message: body, jsep: jsep });
            },
            error: function (error) {
                Janus.error("WebRTC error:", error);
            },
        });
    }
},
그리고 Publish Plugin을 구성할 때처럼 iceState, webrtcState 등에 대한 설정들이 있는데 이 부분에 대해서는 Publish에서 했던 것과 같이 로그만 남길 것이다.
iceState: function (state) {
    // ICE 상태 변화시
    Janus.log(
        "ICE state of this WebRTC PeerConnection (feed #" +
        remoteFeed.rfindex +
        ") changed to " +
        state
    );
},
webrtcState: function (on) {
    // WebRETC PeerConnection 연결시 혹은 중단시
    Janus.log(
        "Janus says this WebRTC PeerConnection (feed #" +
        remoteFeed.rfindex +
        ") is " +
        (on ? "up" : "down") +
        " now"
    );
},
그리고 실질적으로 스트림에 대한 처리를 요구하는 콜백인 onlocalstream가 있는데 이 부분에서는 자신이 Publishing하고 있는 스트림에 대해서 처리한다.
현재는 Subscribing하고 있는 스트림에 대해서 처리하는 Plugin이므로 비워두면 된다.
onlocalstream: function (stream) {
    // Subscriber는 오직 수신만
},
그리고 onremotestream의 경우에는 onlocalstream과 반대로 상대방의 스트림에 대한 처리를 의미하는데, 현재 우리는 Subscribe Plugin이기에 상대방의 스트림의 처리를 해줘야한다.
그러므로 상대방으로부터 전달된 스트림을 저장해준다.
onremotestream: function (stream) {
    Janus.debug("Remote feed #" + remoteFeed.rfid + ", stream:", stream);

    dispatch(
        addSubscribeStream({
            rfid: remoteFeed.rfid,
            stream: stream,
        })
    );
},
oncleanup 콜백을 통해 Subscribe한 참가자가 퇴장시 전역 변수로 관리해주고 있는 부분에서 퇴장한 참가자의 정보를 제거해줘야한다.
oncleanup: function () {
    // 퇴장시 Subscriber Feed에서 제거
    dispatch(
        removeSubscriber({
            rfid: remoteFeed.rfid,
        })
    );
},
그리고 Date Channel이 열렸는지 ondataopen 콜백을 통해 알 수 있는데 이 부분은 로그만 작성해두었다.
ondataopen: function () {
    console.log("remote datachannel opened");
},
그리고 Data Channel에서 Data가 도착하면 발생하는 콜백인 ondata가 존재한다. (이 부분은 우리가 이전에 SDP에 대해 정의할 시 data를 true로 줬기에 발생하는 부분이다.)
우리는 여기서 실제로 채팅을 친 부분에 대한 내용들이 오고 파일을 전송 받을 때 오는 Chunk 값들이 오게되는 통로이다.
이를 우리가 받아보기 위해서는 Json으로 온 데이터를 파싱해주고 해당 부분에서 textroom이라는 key로 온 부분을 추출해낸다.
해당 부분이 message라면 이는 채팅 대화 로직으로 처리해주고 file이라면 파일 로직으로 처리해준다.
먼저, message에 대해 살펴보자.
우리 화상회의에서 정의한 채팅 내용은 두 가지이다.
- 전체 메시지
- 개인 메시지
이를 위해 to라는 구분자를 하나 더 두어 해당 key가 존재한다면 개인 메시지로 없다면 전체 메시지로 간주한다.
이를 위해, to라는 key로 온 부분을 추출해내고 만약 존재한다면 해당 사용자에게 온 개인 메세지인지를 닉네임 비교를 통해 확인하고 자신에게 온 개인메세지라면 저장한다. (아니라면 당연히 저장하지 않는다.)
그리고 개인 메세지가 아니라면 당연히 저장하면 된다.
이 부분에 대해서 왜 Subscribe Plugin에 구현이 되어있는거지라고 의문이 들 수 있으나 당연한 사실이다. Publish Plugin에서 data를 보내면 Subscribe Plugin에 해당 데이터를 전송했다는 메세지를 받아올 것이고 이에 대한 콜백이 호출될 것이기 때문이다.
let json = JSON.parse(data);
let what = json["textroom"];
if (what === "message") {
    let whisper = json["to"];
    console.log(whisper, username);
    if (whisper) {
        if (whisper === username) {
            dispatch(
                receiveChat({
                    display: json["display"],
                    text: json["text"],
                    time: moment().format("HH:mm"),
                    isPrivateMessage: true,
                })
            );
        }
    } else {
        dispatch(
            receiveChat({
                display: json["display"],
                text: json["text"],
                time: moment().format("HH:mm"),
                isPrivateMessage: false,
            })
        );
    }
}
채팅 전송에 대한 부분은 다른 Component에서 구현하고 있으나 채팅에 대한 내용을 진행하고 있으니 같이 살펴보자.
위에서 채팅을 받는 부분(ondata 콜백)에서 살펴볼 수 있었듯이 Json 형태로 데이터를 담아 전송한다.
이 부분은 다음과 같이 구현하면 된다.
비밀 전송을 진행할지 아니면 전체 전송을 진행할지에 대해 체크한 뒤, 비밀 전송이라면 to를 포함시켜 보내고 아니라면 제외한다.
그리고 plugin의 data 메소드를 활용해서 보내고 보내는데 성공했다면 자신의 채팅 내용을 저장해둔다.
위에서 ondata로부터 받는 데이터는 오직 상대방으로부터 온 메시지일 뿐이지 내가 보낸 메시지는 포함하고 있지 않다.
그렇기 때문에 꼭 자신의 채팅 내용까지 확인하려면 따로 저장해주어야 한다.
const sendChatData = () => {
    if (privateTo !== "false") {
        let msg = {
            textroom: "message",
            room: roomId,
            text: inputChat ,
            to: privateTo,
            display: username,
        };

        plugin.data({
            text: JSON.stringify(msg),
            success: function () {
                dispatch(
                    sendChat({
                        text: inputChat,
                        display: username,
                        time: moment().format("HH:mm"),
                        isPrivateMessage: true,
                    })
                );
                console.log("Data Channel Message Sent");
            },
            error: function (err) {
                console.log(err);
            },
        });
    } else {
        let msg = {
            textroom: "message",
            room: roomId,
            text: inputChat,
            display: username,
        };

        plugin.data({
            text: JSON.stringify(msg),
            success: function () {
                dispatch(
                    sendChat({
                        text: inputChat,
                        display: username,
                        time: moment().format("HH:mm"),
                        isPrivateMessage: false,
                    })
                );
                console.log("Data Channel Message Sent");
            },
            error: function (err) {
                console.log(err);
            },
        });
    }

    setInputChat("");
};
이제 파일 전송인 file에 대해서 알아보자.
file은 실시간으로 webRTC Data Channel을 통해 날아온다.
데이터를 보내는데 있어 덩어리(Chunk)로 찢어서 보내고 계속적으로 합쳐가면서 최종적으로 모든 데이터가 도착했다면 최종적인 파일 데이터를 저장하는 식이다.
아래 from은 누구로부터 왔는지, filename은 파일 이름, chunk는 데이터 덩어리(Chunk), last는 마지막 데이터인지를 확인하는 것이다.
만약 파일 전송을 처음 시작했다면 객체를 초기화해주고 이에 차근 차근 담아가다가 마지막(last)이라면 최종적으로 저장한다. (사용했던 객체를 정리해준다.)
else if (what === "file") {
    let from = json["display"];
    let filename = json["file"]["filename"];
    let chunk = json["file"]["message"];
    let last = json["file"]["last"];
    if (!receivedFileChunk[from]) {
        receivedFileChunk[from] = {};
    }
    if (!receivedFileChunk[from][filename]) {
        receivedFileChunk[from][filename] = [];
    }
    receivedFileChunk[from][filename].push(chunk);
    if (last) {
        dispatch(
            sendFile({
                filename: filename,
                file: receivedFileChunk[from][filename].join(""),
                display: from,
                time: moment().format("HH:mm")
            })
        );
        delete receivedFileChunk[from][filename];
    }
}
이 부분 또한 살펴본 김에 같이 살펴보자.
먼저 단순 타입이 file인 Input을 하나 만들어 파일을 담아둔다.
담은 파일이 빌 경우에는 당연히 메시지를 출력해 이를 방지하도록 하고 실제 파일을 보내는 로직을 수행한다.
파일을 쪼개서 보낸다고 했는데 이 데이터 덩어리의 크기는 아래와 같이 설정했고 필요하다면 바꿀 수 있다.
쪼개기에 앞서 미리 파일 정보를 저장하자. (위 채팅에서 설명했듯이 전송자는 데이터를 받을 수 없다. 자신이 직접 저장해야 이를 확인할 수 있다.)
이제 전체적인 전송 로직을 살펴보자.
먼저 FileReader 객체를 만들어 readAsDataURL메소드를 실행해 base64 로 이루어진 데이터를 반환받는다.
해당 덩어리 길이보다 크다면 쪼개서 보내고 남아있는 길이만큼을 다시 재귀적으로 보낸다.
만약 마지막이라면 더이상 쪼갤 수 있는 것이 존재하지 않기에 남은 만큼을 보낸 뒤 종료된다.
코드는 아래와 같다.
const handleFileTransfer = () => {
        if (!chosenFile) {
          alert("파일을 선택해주세요");
          return;
        }
        const file = chosenFile;
        const chunkLength = 8*1024;

        const onReadAsDataURL = (event, text) => {
          var data = {}; // Data Channel을 통해 보낼 데이터 객체
          data.filename = file.name; // data의 이름 설정 (=> 파일 이름)
          if (event) {
            text = event.target.result; // 처음 실행시
            console.log(text);
            dispatch(
                sendFile({
                    filename:file.name,
                    file: text,
                    display: username,
                    time: moment().format("HH:mm")
                })
            );
          }

          if (text.length > chunkLength) { // Chunk로 찢어서 보내게 됨
            data.message = text.slice(0, chunkLength); // Chunk Length보다 크다면
          } else { // 모두 보내고 마지막 Chunk만이 남아있다.
            data.message = text;
            data.last = true; // 마지막임을 설정
          }
          sendFileToDataChannel(data); // use JSON.stringify for chrome!

          var remainingDataURL = text.slice(data.message.length);
          if (remainingDataURL.length)
            setTimeout(function () {
              onReadAsDataURL(null, remainingDataURL); // 남은 부분에 대해 전송 계속적으로 진행
            }, 100);
        };

        let fileReader = new FileReader();
        fileReader.readAsDataURL(file);
        fileReader.addEventListener("load", onReadAsDataURL);
    };

    const sendFileToDataChannel = (file) => {
        let msg = {
            textroom: "file",
            room: roomId,
            file: file,
            display: username,
        };

        plugin.data({
            text: JSON.stringify(msg),
            success: function () {
                console.log("Data Channel Message Sent");
            },
            error: function (err) {
                console.log(err);
            },
        });
    };
이로써 전반적인 newRemoteFeed 함수에 대해 살펴보았다.
전체적인 코드는 아래와 같다.
function newRemoteFeed(id, display, audio, video) {
    // 새로운 피드가 Publish되면, 새로운 피드를 생성해 Subscribe한다.
    let remoteFeed = null;
    janus.attach({
        plugin: "janus.plugin.videoroom",
        opaqueId: opaqueId,
        success: function (pluginHandle) {
            remoteFeed = pluginHandle;
            Janus.log(
                "Plugin attached! (" +
                remoteFeed.getPlugin() +
                ", id=" +
                remoteFeed.getId() +
                ")"
            );
            Janus.log("  -- This is a subscriber");

            let subscribe = null;
            if (pin) {
                subscribe = {
                    request: "join",
                    room: roomId,
                    ptype: "subscriber",
                    feed: id,
                    pin: pin,
                    private_id: publishFeed.pvtid,
                };
            } else {
                subscribe = {
                    request: "join",
                    room: roomId,
                    ptype: "subscriber",
                    feed: id,
                    private_id: publishFeed.pvtid,
                };
            }

            // Subscribe 메세지를 담아 Plugin에 전송 (Plugin 측에서 Offer를 생성하여 전송해줌)
            remoteFeed.videoCodec = video;
            remoteFeed.send({ message: subscribe });
        },
        error: function (error) {
            Janus.error("  -- Error attaching plugin...", error);
        },
        onmessage: function (msg, jsep) {
            Janus.debug(" ::: Got a message (subscriber) :::", msg);
            var event = msg["videoroom"];
            Janus.debug("Event: " + event);
            if (msg["error"]) {
                console.log(msg["error"]);
            } else if (event) {
                if (event === "attached") {
                    remoteFeed.rfid = msg["id"];
                    remoteFeed.rfdisplay = msg["display"];
                    dispatch(
                        subscribeFeed({
                            id: msg["id"],
                            display: msg["display"],
                        })
                    );
                    Janus.log(
                        "Successfully attached to feed " +
                        remoteFeed.rfid +
                        " (" +
                        remoteFeed.rfdisplay +
                        ") in room " +
                        msg["room"]
                    );
                } else if (event === "event") {
                    // publisher로부터의 동시캐스트를 사용할 시 사용 (현재 사용 X)
                } else {
                    // What has just happened?
                }
            }
            if (jsep) {
                Janus.debug("Handling SDP as well...", jsep);
                // Answer and attach
                remoteFeed.createAnswer({
                    jsep: jsep,
                    // Audio와 Video를 보내지 않는다.(전송은 Publisher)
                    media: {
                        data: true,
                        audioSend: false,
                        videoSend: false,
                    },
                    success: function (jsep) {
                        Janus.debug("Got SDP!", jsep);
                        var body = { request: "start", room: roomId };
                        remoteFeed.send({ message: body, jsep: jsep });
                    },
                    error: function (error) {
                        Janus.error("WebRTC error:", error);
                    },
                });
            }
        },
        iceState: function (state) {
            // ICE 상태 변화시
            Janus.log(
                "ICE state of this WebRTC PeerConnection (feed #" +
                remoteFeed.rfindex +
                ") changed to " +
                state
            );
        },
        webrtcState: function (on) {
            // WebRETC PeerConnection 연결시 혹은 중단시
            Janus.log(
                "Janus says this WebRTC PeerConnection (feed #" +
                remoteFeed.rfindex +
                ") is " +
                (on ? "up" : "down") +
                " now"
            );
        },
        onlocalstream: function (stream) {
            // Subscriber는 오직 수신만
        },
        onremotestream: function (stream) {
            Janus.debug("Remote feed #" + remoteFeed.rfid + ", stream:", stream);

            dispatch(
                addSubscribeStream({
                    rfid: remoteFeed.rfid,
                    stream: stream,
                })
            );
        },
        oncleanup: function () {
            // 퇴장시 Subscriber Feed에서 제거
            dispatch(
                removeSubscriber({
                    rfid: remoteFeed.rfid,
                })
            );
        },
        ondataopen: function () {
            console.log("remote datachannel opened");
        },
        ondata: function (data) {
            let json = JSON.parse(data);
            let what = json["textroom"];
            if (what === "message") {
                let whisper = json["to"];
                console.log(whisper, username);
                if (whisper) {
                    if (whisper === username) {
                        dispatch(
                            receiveChat({
                                display: json["display"],
                                text: json["text"],
                                time: moment().format("HH:mm"),
                                isPrivateMessage: true,
                            })
                        );
                    }
                } else {
                    dispatch(
                        receiveChat({
                            display: json["display"],
                            text: json["text"],
                            time: moment().format("HH:mm"),
                            isPrivateMessage: false,
                        })
                    );
                }
            }
        }
    });
}
이제 다시 publishOwnFeed와 newRemoteFeed를 호출한 곳으로 돌아가자.
한참 전이라 기억이 잘 나지 않을 수도 있으니 다시 한 번 언급하자면 Publisher가 join을 진행하고 성공적으로 joined 되었을 시 즉각적인 PeerConnection 협상을 위해 publishOwnFeed가 호출되었고 기존 Publisher에 대한 Subscribe를 위해 newRemoteFeed가 호출되었다.
방이 파괴된다면 destroyed 콜백이 발생할 것이다.
방이 파괴된다면 당연히 해당 방에서 나가 방을 조회하는 곳으로 가야할 것이다.
else if (event === "destroyed") {
    // 방 삭제
    Janus.warn("The room has been destroyed!");
    navigate("/");
}
그리고 Publish Plugin에서 다양한 이벤트들에 대한 event를 발생시킨다. (위에서 살펴본 onmessage 콜백이다.)
그것들은 새로운 Publisher의 등장, 참가 중인 Publisher 중 한명이 퇴장, Publisher가 Publish를 중지, 에러 등을 의미한다.
이를 실제로 처리하는 부분들은 다음과 같다.
먼저 새로운 참가자들이 존재한다면 다음과 같이 단순히 Subscriber들을 저장하던 배열에 저장해버리면 된다. (이전에는 Join을 진행하고 기존에 존재하던 참가자들을 등록하는 반면 이번에는 새로운 참가자를 등록하는 것이다.)
if (msg["publishers"]) {
    var list = msg["publishers"];
    Janus.debug(
        "Got a list of available publishers/feeds:",
        list
    );
    Janus.log("JanusMessage !!!! " , msg["publishers"])
    for (var f in list) {
        var id = list[f]["id"];
        var display = list[f]["display"];
        var audio = list[f]["audio_codec"];
        var video = list[f]["video_codec"];
        Janus.debug(
            "  >> [" +
            id +
            "] " +
            display +
            " (audio: " +
            audio +
            ", video: " +
            video +
            ")"
        );
        // 모두 Subscribe 진행unpublish
        newRemoteFeed(id, display, audio, video);
    }
참가자가 나가거나 unpublish한다면
그리고 기존에 참가 중이던 Publisher가 퇴장하거나 unpublish한다면 leave, unpublihsed 메시지가 날아오고 위에서와 반대로 Subscriber들을 저장하던 배열에서 제거하면된다.
여기서 unpublish에 대해서도 제거한 이유는 추후에 다루겠지만 사용자가 퇴장할 시 unpublish 이벤트를 발생시켜 퇴장시킬 것이기 때문이다.
else if (msg["leaving"]) {
    // One of the publishers has gone away?
    var leaving = msg["leaving"];
    if (msg["leaving"] === "ok") {
        return;
    }

    dispatch(
        removeSubscriber({
            rfid: leaving,
        })
    );
} else if (msg["unpublished"]) {
    var unpublished = msg["unpublished"];
    if (unpublished === "ok") {
        return;
    }

    dispatch(
        removeSubscriber({
            rfid: unpublished,
        })
    );
}
그리고 에러에 대한 처리다.
Janus에서는 Plugin 요청에 대한 에러가 발생할 시 코드와 함께 내려준다.
우리는 단지 방 비밀번호가 잘못되었다는 부분에 대한 처리를 진행할 것이기에 433 코드에 대해서만 처리를 진행해주었고
방이 존재하지 않으면 발생하는 426에러에 대해서는 추후 처리할 예정이다.
else if (msg["error"]) {
    if (msg["error_code"] === 433) {
        navigate("/rooms");
        alert(`잘못된 비밀번호입니다!`);
    } else if (msg["error_code"] === 426) {
        // This is a "no such room" error: give a more meaningful description
    } else {
        Janus.error(msg["error"]);
    }
}
그리고 우리가 요청한 부분에 대해 거절당할시 jsep가 함께 담겨서 오는데 이러 부분에 대한 처리를 진행해줄 수 있다.
특정한 경우가 아니고서야 거절당할일이 존재하지 않기에 이를 처리해주지 않았고 필요하다면 이 부분을 활용하면 된다.
if (jsep) {
    Janus.debug("Handling SDP as well...", jsep);
    storePlugin.handleRemoteJsep({ jsep: jsep });
    // Audio가 거절당할시
    var audio = msg["audio_codec"];
    if (
        mystream &&
        mystream.getAudioTracks() &&
        mystream.getAudioTracks().length > 0 &&
        !audio
    ) {
        Janus.log(
            "Our audio stream has been rejected, viewers won't hear us"
        );
    }

    // Video가 거절당할시
    var video = msg["video_codec"];
    if (
        mystream &&
        mystream.getVideoTracks() &&
        mystream.getVideoTracks().length > 0 &&
        !video
    ) {
        Janus.log(
            "Our video stream has been rejected, viewers won't see us"
        );
    }
}
},
그리고 스트림을 처리해주는 onlocalstream 콜백이다.
Publish Plugin에서는 자신의 스트림에 대해서 다루고 상대방의 스트림에 대해서는 다루지 않으므로 Subscribe Plugin에서와 다르게 onlocalstream 콜백에서 처리를 해주어야 한다.
다음과 같이 Publish하는 스트림에 대해 저장해두어 자신의 Stream 정보 또한 볼 수 있게 한다.
onlocalstream: function (stream) {
    Janus.debug(" ::: Got a local stream :::", stream);
    mystream = stream;
    dispatch(
        addPublishStream({
            stream: stream,
        })
    );
    dispatch(
        changeMainFeed({
            stream: stream,
            display: username,
        })
    );
    // Video 존재 여부에 따른 처리
    // var videoTracks = stream.getVideoTracks();
    // if (!videoTracks || videoTracks.length === 0) {

    // } else {

    // }
},
그리고 onremotestream의 경우 처리하지 않기에 이는 비워두었다.
 onremotestream: function (stream) {
     // 오직 Publish에서만 전송
 },
그리고 Data Channel이 열리는 부분에 대한 콜백인 ondataopen은 여전히 로그만 남겼고 data를 받는 콜백인 ondata의 경우에는 Publisher Plugin의 경우 쓸모 없기에 처리를 해주지 않았다.
ondataopen: function (data) {
    console.log("data channel opened");
},
ondata: function (data) {
    Janus.log("Receive Data: ", data);
},
그리고 종료될 때 발생하는 콜백인 oncleanup은 단순 로그만 처리해두었다.
oncleanup: function () {
    Janus.log(
        " ::: Got a cleanup notification: we are unpublished now :::"
    );
    mystream = null;
},
길고 길었던 Publish Plugin에 대한 설명도 끝이 났다.
전체적인 코드는 다음과 같다.
Janus.init({
debug: "all",
callback: function () {
// WebRTC 지원안할시
if (!Janus.isWebrtcSupported()) {
Janus.log("No WebRTC support... ");
return;
}
// 세션 생성
janus = new Janus({
server: myserver,
success: function () {
// VideoRoom Plugin 연결
janus.attach({
plugin: "janus.plugin.videoroom",
opaqueId: opaqueId,
success: function (pluginHandle) {
storePlugin = pluginHandle;
Janus.log(
"Plugin attached! (" +
storePlugin.getPlugin() +
", id=" +
storePlugin.getId() +
")"
);
Janus.log(" -- This is a publisher/manager");
if (pin) {
var register = {
request: "join",
room: roomId,
ptype: "publisher",
display: username,
pin: pin,
};
} else {
var register = {
request: "join",
room: roomId,
ptype: "publisher",
display: username,
};
}
storePlugin.send({ message: register });
},
error: function (error) {
// 에러 발생시
Janus.error(" -- Error attaching plugin...", error);
Janus.log("Error attaching plugin... " + error);
},
consentDialog: function (on) {
Janus.debug(
"Consent dialog should be " + (on ? "on" : "off") + " now"
);
if (on) {
// getUserMedia 호출되기 전
} else {
// getUserMedia 호출되기 후
}
},
iceState: function (state) {
// ICE 상태 변화시
Janus.log("ICE state changed to " + state);
},
mediaState: function (medium, on) {
// Media 정보를 받기 시작하거나 중지할시
Janus.log(
"Janus " +
(on ? "started" : "stopped") +
" receiving our " +
medium
);
},
webrtcState: function (on) {
// ICE, DTLS를 포함한 모든 것이 성공하여 PeerConnection이 활성화 => true
//PeerConnection이 죽는다면 파라미터가 false
Janus.log(
"Janus says our WebRTC PeerConnection is " +
(on ? "up" : "down") +
" now"
);
if (!on) {
return;
}
},
onmessage: function (msg, jsep) {
// Plugin으로부터 Message/Event 수신 (Join시 발생)
Janus.debug(" ::: Got a message (publisher) :::", msg);
var event = msg["videoroom"];
Janus.debug("Event: " + event);
if (event) {
if (event === "joined") {
// Publisher가 Join시 WebRTC와 협상하거나 존재하는 피드에 연결
dispatch(
joinRoom({
room: msg["room"],
publisherId: msg["id"],
display: username,
publisherPvtId: msg["private_id"],
})
);
Janus.log(
"Successfully joined room " +
msg["room"] +
" with ID " +
id
);
// SDP offer과 Publisher로 등록 진행
publishOwnFeed(true);
// 다른 Publisher들이 존재할시
if (msg["publishers"]) {
var list = msg["publishers"];
Janus.debug(
"Got a list of available publishers/feeds:",
list
);
for (var f in list) {
var id = list[f]["id"];
var display = list[f]["display"];
var audio = list[f]["audio_codec"];
var video = list[f]["video_codec"];
Janus.debug(
" >> [" +
id +
"] " +
display +
" (audio: " +
audio +
", video: " +
video +
")"
);
// 모두 Subscribe 진행
newRemoteFeed(id, display, audio, video);
}
}
} else if (event === "destroyed") {
// 방 삭제
Janus.warn("The room has been destroyed!");
navigate('/study/'+studyId+'/board/rooms');
} else if (event === "event") {
// 새로운 Publisher 접속시
if (msg["publishers"]) {
var list = msg["publishers"];
Janus.debug(
"Got a list of available publishers/feeds:",
list
);
for (var f in list) {
var id = list[f]["id"];
var display = list[f]["display"];
var audio = list[f]["audio_codec"];
var video = list[f]["video_codec"];
Janus.debug(
" >> [" +
id +
"] " +
display +
" (audio: " +
audio +
", video: " +
video +
")"
);
// 모두 Subscribe 진행unpublish
newRemoteFeed(id, display, audio, video);
}
} else if (msg["leaving"]) {
// One of the publishers has gone away?
var leaving = msg["leaving"];
if (msg["leaving"] === "ok") {
return;
}
dispatch(
removeSubscriber({
rfid: leaving,
})
);
} else if (msg["unpublished"]) {
var unpublished = msg["unpublished"];
if (unpublished === "ok") {
return;
}
dispatch(
removeSubscriber({
rfid: unpublished,
})
);
} else if (msg["error"]) {
if (msg["error_code"] === 433) {
navigate("/rooms");
alert(`잘못된 비밀번호입니다!`);
} else if (msg["error_code"] === 426) {
// This is a "no such room" error: give a more meaningful description
} else {
Janus.error(msg["error"]);
}
}
}
}
if (jsep) {
Janus.debug("Handling SDP as well...", jsep);
storePlugin.handleRemoteJsep({ jsep: jsep });
// Audio가 거절당할시
var audio = msg["audio_codec"];
if (
mystream &&
mystream.getAudioTracks() &&
mystream.getAudioTracks().length > 0 &&
!audio
) {
Janus.log(
"Our audio stream has been rejected, viewers won't hear us"
);
}
// Video가 거절당할시
var video = msg["video_codec"];
if (
mystream &&
mystream.getVideoTracks() &&
mystream.getVideoTracks().length > 0 &&
!video
) {
Janus.log(
"Our video stream has been rejected, viewers won't see us"
);
}
}
},
onlocalstream: function (stream) {
Janus.debug(" ::: Got a local stream :::", stream);
mystream = stream;
dispatch(
addPublishStream({
stream: stream,
})
);
dispatch(
changeMainFeed({
stream: stream,
display: username,
})
);
// Video 존재 여부에 따른 처리
// var videoTracks = stream.getVideoTracks();
// if (!videoTracks || videoTracks.length === 0) {
// } else {
// }
},
onremotestream: function (stream) {
// 오직 Publish에서만 전송
},
ondataopen: function (data) {
console.log("data channel opened");
},
ondata: function (data) {
Janus.log("Receive Data: ", data);
},
oncleanup: function () {
Janus.log(
" ::: Got a cleanup notification: we are unpublished now :::"
);
mystream = null;
},
});
},
error: function (error) {
Janus.error(error);
},
destroyed: function () {
Janus.log("Janus Destroyed!");
},
});
},
});
지금까지 전반적으로 화상회의 Publish와 Subscribe 구조에 대해 살펴보았다.
아직 몇가지 부분이 남아있다.
이는 비디오 공유 중지, 오디오 음소거, 화면 공유, 퇴장 처리이다.
하지만 이는 위에서 했던 부분에서 크게 벗어나지 않고 매우 간단하다.
먼저 비디오 공유 중지와 오디오 음소거를 살펴보자.
이 둘은 단순 저장한 Plugin 객체의 메소드로 존재한다.
음소거에 대해서는 다음과 같이 storePlugin.unmuteAudio()을 통해 음소거 해제를 하거나 storePlugin.muteAudio()를 통해 음소거시키면 된다.
비디오 공유 중지에 대해서는 storePlugin.unmuteVideo()를 통해 비디오를 다시 켜거나 storePlugin.muteVideo()를 통해 비디오 공유를 중지하면 된다.
단순 이러한 작업에 있어 버튼 설명 표시를 위한 텍스트를 출력하기 위해 현재 어떤 상태에 놓여있는지 저장만 하면 된다.
const toggleAudioHandler = () => {
    if (isAudioOff) storePlugin.unmuteAudio();
    else storePlugin.muteAudio();
    dispatch(
        toggleAudio()
    );
};

const toggleVideoHandler = () => {
    if (isVideoOff) storePlugin.unmuteVideo();
    else storePlugin.muteVideo();
    dispatch(
        toggleVideo()
    );
};
화면 공유의 경우에는 협상을 재진행하면 된다.
단순 비디오를 공유하던 것에서 자신의 스크린을 공유한다는 것으로 재협상을 진행하면된다.
다음과 같이 화면 공유 중일시에는 화면 공유를 끄기 위해 video에 대한 정보를 담지 않아 default로 설정하게 하고 replaceVideo를 true로 설정해 비디오 설정을 바꿀 수 있게 한다.
만약 화면 공유가 아닐 시에는 화면 공유를 켜기 위해 media의 video에 screen을 담아 보내고 마찬가지로 replaceVideo를 true로 설정해 비디오 설정을 바꿀 수 있게 한다. (크롬의 경우, 화면 공유를 위한 확장 프로그램이 설치되어있어야하므로 다음과 같은 alert를 발생시켜보았다.)
const toggleScreenSharingHandler = () => {
    if (isScreenSharingOff) {
        storePlugin.createOffer({
            media: {
                video: "screen",
                replaceVideo: true,
            },
            success: function (jsep) {
                dispatch(
                    toggleScreenSharing()
                );
                storePlugin.send({
                    message: {
                        request: "configure",
                        audio: isAudioOff,
                        video: true
                    },
                    jsep: jsep,
                });
            },
            error: function (error) {
                Janus.error("WebRTC error:", error);
            },
        });
    } else {
        if (!Janus.isExtensionEnabled()) {
            Janus.log(
                "화면 공유를 위한 크롬 확장 프로그램이 설치되어 있지 않습니다. 다음 링크에서 설치해주세요. <b><a href='https://chrome.google.com/webstore/detail/janus-webrtc-screensharin/hapfgfdkleiggjjpfpenajgdnfckjpaj' target='_blank'>링크</a></b>"
            );
            return;
        }

        storePlugin.createOffer({
            media: {
                replaceVideo: true,
            },
            success: function (jsep) {
                dispatch(
                    toggleScreenSharing()
                );
                storePlugin.send({
                    message: {
                        request: "configure",
                        audio: isAudioOff,
                        video: true
                    },
                    jsep: jsep,
                });
            },
            error: function (error) {
                Janus.error("WebRTC error:", error);
            },
        });
    }
};
다음은 실제로 우리가 퇴장하는 부분에 대해 처리해야한다.
우리가 나가게 되면 unpublish 혹은 leave 메세지를 Plugin에 보내 다른 사용자들이 해당 참가자를 제거할 수 있도록 만들어야 한다.
그렇기 때문에 이에 대한 메세지를 처리하는 부분을 작성해보려고 한다.
나는 이 부분에 대한 처리를 언마운트 될 때 진행하도록 했다.
return () => {
    console.log("언마운트");
    if (janus && janus.isConnected()) {
        const unpublish = {
            request: "unpublish",
        };
        storePlugin.send({
            message: unpublish,
            success: () => {
                dispatch(exitRoom());
                janus.destroy();
            },
        });
    }
};
이렇게 까지 된다면 전체적인 비지니스 로직에 대한 구성이 완료되었고 나머지 뷰적인 측면만 고려하면 된다.
이렇게 뷰까지 고려하여 완성된다면 다음과 같은 모습을 확인할 수 있다.
동작 확인
카메라의 경우 가상 카메라를 사용하고 있어 실제 화면이 나오지 않는 점 양해부탁드립니다.
지금까지 구현한 부분들에 대해서 실제로 동작하는 모습을 보여줍니다.
방 생성
방 입장
비디오 온오프 (소리는 생략)

다른 참가자 입장
화면 공유

채팅
참가자 목록

파일 전송
정리
이렇게 Spring을 통해 생성된 화상회의 방 안에서 Janus와 통신하며 화상회의를 구성하는 것에 대해 살펴보았습니다.
전체적인 코드를 가져와 꼼꼼히 설명할 순 없었지만 전반적인 흐름을 따라가며 어떤 방식으로 화상회의가 진행되고 동작하는지에 대해서 설명해보려고 노력했습니다.
물론, 개인적으로 학습한 내용을 토대로 진행한 부분이기에 틀린 부분이 존재할 수 있습니다.
이러한 부분에 대해서는 지적을 해주신다면 적극적으로 반영하도록 하겠습니다!
'개발일지' 카테고리의 다른 글
| 접근 제어 부분 리팩토링 (0) | 2022.02.14 |
|---|---|
| [WebRTC] Janus를 활용해 화상회의 만들기(Spring편) - (1) (0) | 2022.02.12 |
| [WebRTC] Janus REST API 활용법 (0) | 2022.02.10 |
| [WebRTC] Janus란 (동작, 설치, Demo 서비스) (0) | 2022.02.09 |
| [Junit5] Static Method Mocking (0) | 2022.02.08 |