Janus란?
Janus란 미디어 서버를 사용할 수 있게 구성한 오픈 소스이다.
Janus는 어떤 방식으로 우리에게 서비스를 제공하는지 자세히 알아보자.
Janus에 관한 동작 방식은 다음 유튜브 링크에서 잘 설명되어져 있다.
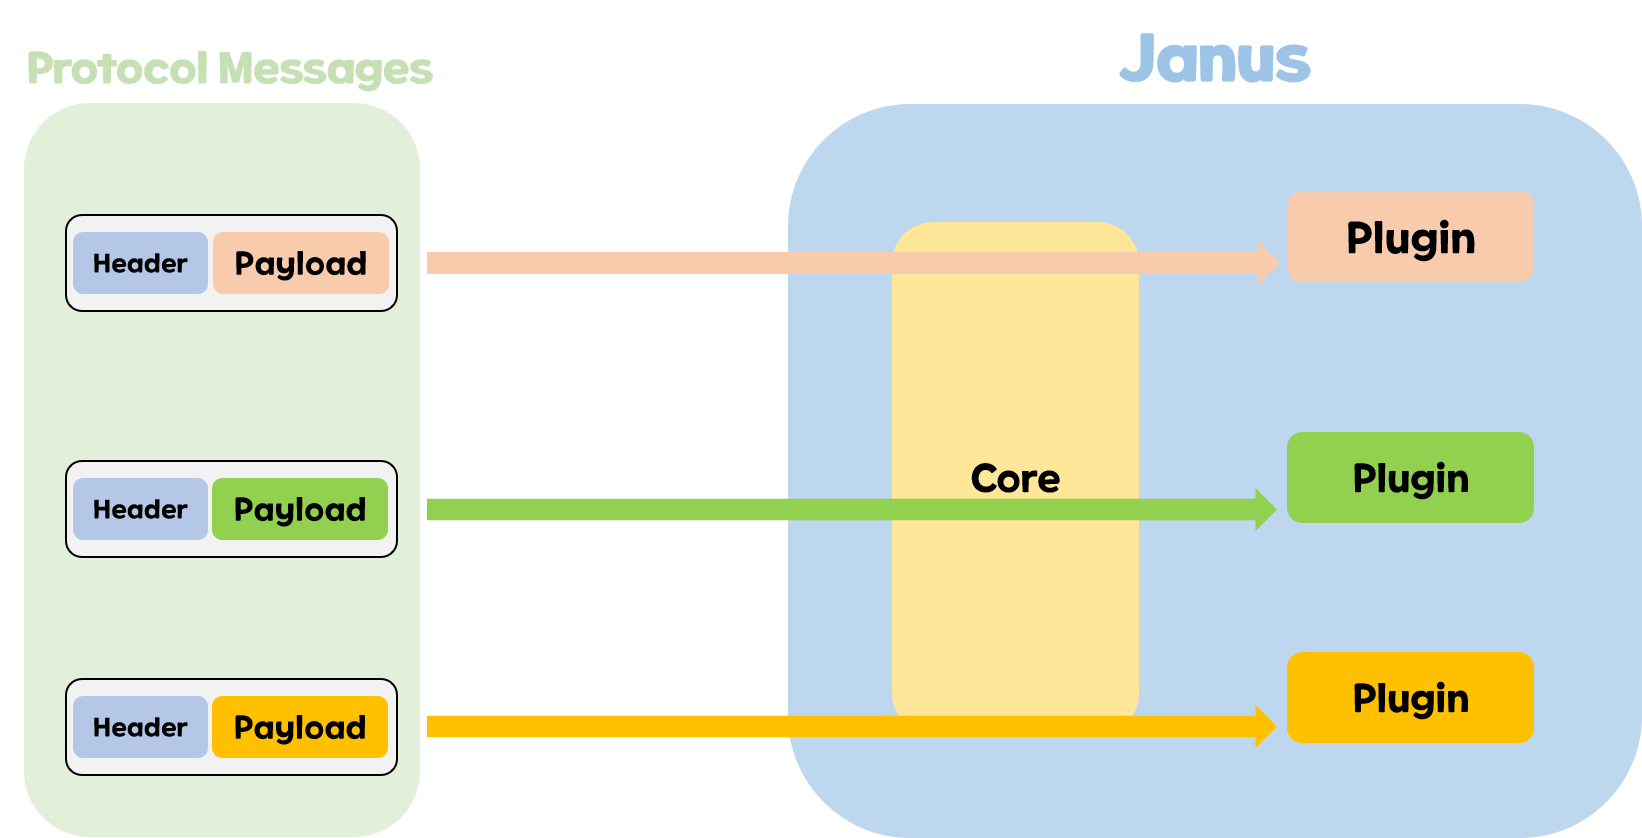
여기서 설명하는 구조에 대해 간단하게 알아보자면 다음과 같다.

위의 그림에서와 같이 Janus는 WebRTC 기능을 제공하는 Core 부분과 실제 어플리케이션 기능을 제공해주는 Plugin으로 나누어져 있다.
여기서 어플리케이션 기능을 제공해주는 Plugin이란 다음과 같다.
Streaming Plugin, VideoCall Plugin, AudioBridge Plugin, VideoRoom Plugin, TextRoom Plugin, Record&Play Plugin, VoiceMail Plugin 등이 존재한다.
이름에서 대부분 유추할 수 있듯이 비디오방 관련 플러그인, 음성메일 관련 플러그인, 단순 채팅방 관련 플러그인 등등이 존재한다.
여기서 PeerConnection을 하는 부분에 있어서 다양한 방식으로 진행할 수 있다.
위의 그림에서 나와있듯이 Janus에서 제공하는 REST API 방식을 사용할 수도 있고 웹 소켓을 사용할 수도 있고 다른 방식을 사용할 수도 있다. (보통 REST API로 사용하는 것을 권장하고 있다.)
이렇게 PeerConnection이 완료되고 사용할 Plugin을 Attach하게 되면 실제 동작 방식은 다음과 같다.
실제로 Plugin에 정해진 Message들이 존재하는데 해당 Message들을 Plugin에 보내면 해당 Request에 맞는 Response를 반환해준다.
우리는 다양한 플러그인들을 조합해서 이용한다.
우리가 만약 화상회의를 구성한다고 한다면 기본적으로 비디오를 출력해줘야하고 부가적으로 채팅이 있으면 좋을 것이다.
이러한 부분을 플러그인을 통해 구성해주면 다음과 같이 구성할 수 있다.
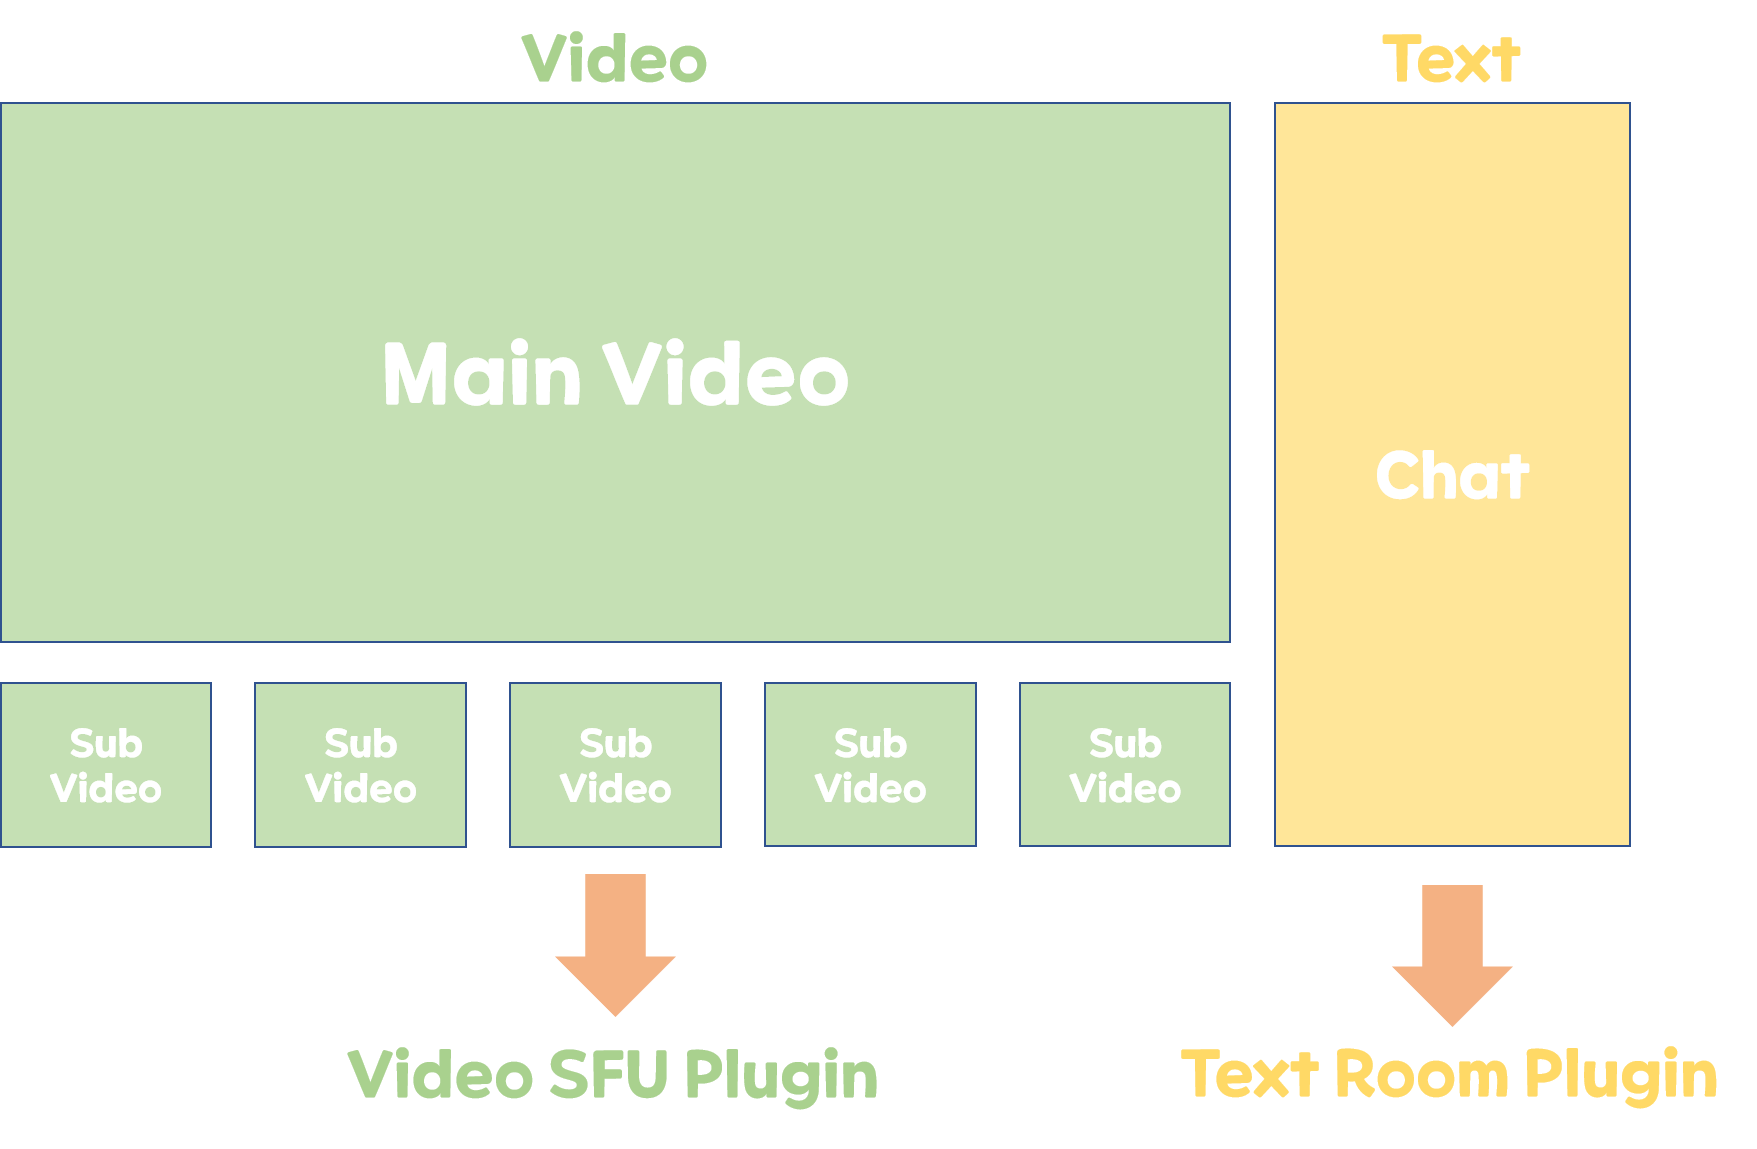
위와 같이 Video Plugin을 Attach하고 비디오에 대한 정보를 송수신하고 텍스트에 대한 정보는 TextRoom Plugin을 Attach하고 받아오면 될 것이다. (물론, VideoRoom Plugin에서 Data Channel을 열어 텍스트 정보를 주고 받을 수 있지만 여러 Plugin을 Attach하고 Detach하면서 여러 조합에 대한 Customizing이 쉽다는 사실을 표현하고자 다음과 같이 사진을 구성했습니다.)
물론 위와 같이 화상회의를 구성하지 않고 다양하게 원하는 조합들을 직접 Plugin들을 통해 만들어 낼 수 있다.
기본적인 Janus의 구조는 Web RTC를 기반으로하기 때문에 Web RTC에 대해 이전 포스트들에 대해서 전반적으로 감을 잡았다면 Janus에 대해서도 잘 알 수 있을 것이다.
Janus 설치
Janus는 Linux 환경을 기반으로 제공하지만 윈도우에서 지원하는 WSL(리눅스를 구동할 수 있도록 도와주는 기능)을 이용해 윈도우에서도 Janus를 이용해볼 수 있다.
이제 Janus를 실제로 설치하는 방법에 대해서 알아보자.
Janus를 설치하는 방법은 Janus의 공식 Git에 자세히 잘 나와있다. (meetecho/janus-gateway: Janus WebRTC Server (github.com))
Janus는 많은 의존 라이브러리를 요구하기 때문에 상당히 설치하기 까다로운 면이 존재했다.
나와있는 설명이 친절해 위의 과정을 따라가도 되지만 Janus를 이미 도커 이미지로 구성해놓은 부분이 존재하기 때문에 이를 활용하여 좀 더 쾌적하게 Janus를 설치해보자.
다음 링크에서 볼 수 있듯이 Janus Image를 Docker Hub에서 이미 제공하고 있으니 이를 이용해보자. (canyan/janus-gateway - Docker Image | Docker Hub)
이 링크의 아래 설명에서 보면 알 수 있듯이 docker-compose를 활용하는 방법에 대해서도 잘 나와있다.
version: "3.8"
services:
  janus-gateway:
    image: 'canyan/janus-gateway:latest'
    command: [ "/usr/local/bin/janus", "-F", "/usr/local/etc/janus" ]
    ports:
      - "8088:8088"
      - "8089:8089"
      - "8889:8889"
      - "8000:8000"
      - "7088:7088"
      - "7089:7089"
    volumes:
      - "./janus/janus.jcfg:/usr/local/etc/janus/janus.jcfg"
      - "./janus/janus.transport.http.jcfg:/usr/local/etc/janus/janus.transport.http.jcfg"
    restart: always
이를 자세하게 살펴보자.
- 명령어
- /usr/local/bin/janus -F /usr/local/etc/janus 로 실행
- 포트
- HTTP 통신을 하기 위한 포트 8088을 8088로 매핑 (일반적인 요청)
- HTTPS 통신을 하기 위한 8089을 8089로 매핑 (일반적인 요청)
- Janus 뒤에 FrontEnd 배포를 위해 포트 8000을 8000으로 매핑
- HTTP 통신을 하기 위한 포트 7088을 7088로 매핑 (Admin 요청)
- HTTPS 통신을 하기 위한 포트 7089을 7089로 매핑 (Admin 요청)
- 볼륨 마운팅
- Janus의 메인 설정을 진행하는 janus.jcfg 파일을 마운팅
- HTTP 통신을 위한 설정을 진행하는 janus.transport.http.jcfg 파일을 마운팅
명령어와 포트 자체는 Janus의 설정에 따라 Docker-compose 파일을 작성해주었다.
이제 마운팅 되는 파일에 대해서 살펴보자. (마운팅 되는 파일은 Docker-compose.yml 파일을 기준으로 ./janus에 존재해야 한다.)
Janus의 메인 설정을 다루는 janus.jcfg파일을 먼저 살펴보자.
이곳에서 다양한 설정들(일반 설정, 로깅, 인증 관련, 인증서, 미디어 설정, NAT 설정 등)을 변경할 수 있지만 실행하는데 있어 바꿔야하는 부분에 대해서 살펴보려고 한다.
나는 Admin HTTP를 통해 Video Room을 생성, 수정, 삭제할 것이기에 Admin에 대한 설정을 진행해야하는데 janus.jcfg에서 Admin 비밀번호에 대한 설정을 가지고 있다.
이 부분에 대해 설정을 진행해보자.
admin_secret = "janusoverlord"    # String that all Janus requests must contain
                                    # to be accepted/authorized by the admin/monitor.
                                    # only needed if you enabled the admin API
                                    # in any of the available transports.
위의 부분에서 Admin Default Secret을 변경해주고 사용하면 된다.
그리고 로깅에 대한 부분이나, 인증, 인증서 관련 부분에 대해서는 디폴트 설정으로 두었다. (필요하다면 수정해서 쓰시면 됩니다.)
그리고 미디어 세팅 부분에서 IPv6에 대한 허용 여부와 Plugin과 소통할 때 사용하는 RTP 프로토콜의 포트 사용 범위에 대해서 설정할 수 있다.
이 부분에 대해서도 디폴트 설정으로 두었다.
media: {
    #ipv6 = false
    #min_nack_queue = 500
    #rtp_port_range = "20000-40000"
    #dtls_mtu = 1200
    #no_media_timer = 1
    #slowlink_threshold = 4
    #twcc_period = 100
    #dtls_timeout = 500
    # If you need DSCP packet marking and prioritization, you can configure
    # the 'dscp' property to a specific values, and Janus will try to
    # set it on all outgoing packets using libnice. Normally, the specs
    # suggest to use different values depending on whether audio, video
    # or data are used, but since all PeerConnections in Janus are bundled,
    # we can only use one. You can refer to this document for more info:
    # https://tools.ietf.org/html/draft-ietf-tsvwg-rtcweb-qos-18#page-6
    # That said, DON'T TOUCH THIS IF YOU DON'T KNOW WHAT IT MEANS!
    #dscp = 46
}
그리고 NAT 관련 설정을 진행해보자.
우리는 대부분 사설 IP 환경에서 사용하고 있기에 STUN 서버는 기본적으로 필요할 것이라고 생각된다.
그래서 이 부분에 대한 설정을 진행해주는 부분을 보면 아래와 같다.
nat: {
    stun_server = "stun.l.google.com"
    stun_port = 19302
    nice_debug = false
    #full_trickle = true
    #ice_lite = true
    #ice_tcp = true
    # By default Janus tries to resolve mDNS (.local) candidates: even
    # though this is now done asynchronously and shouldn't keep the API
    # busy, even in case mDNS resolution takes a long time to timeout,
    # you can choose to drop all .local candidates instead, which is
    # helpful in case you know clients will never be in the same private
    # network as the one the Janus instance is running from. Notice that
    # this will cause ICE to fail if mDNS is the only way to connect!
    #ignore_mdns = true
    # In case you're deploying Janus on a server which is configured with
    # a 1:1 NAT (e.g., Amazon EC2), you might want to also specify the public
    # address of the machine using the setting below. This will result in
    # all host candidates (which normally have a private IP address) to
    # be rewritten with the public address provided in the settings. As
    # such, use the option with caution and only if you know what you're doing.
    # Make sure you keep ICE Lite disabled, though, as it's not strictly
    # speaking a publicly reachable server, and a NAT is still involved.
    # If you'd rather keep the private IP address in place, rather than
    # replacing it (and so have both of them as advertised candidates),
    # then set the 'keep_private_host' property to true.
    # Multiple public IP addresses can be specified as a comma separated list
    # if the Janus is deployed in a DMZ between two 1-1 NAT for internal and
    # external users.
    nat_1_1_mapping = "1.2.3.4"  # The machine's public IP address
    #keep_private_host = true
    # You can configure a TURN server in two different ways: specifying a
    # statically configured TURN server, and thus provide the address of the
    # TURN server, the transport (udp/tcp/tls) to use, and a set of valid
    # credentials to authenticate...
    #turn_server = "myturnserver.com"
    #turn_port = 3478
    #turn_type = "udp"
    #turn_user = "myuser"
    #turn_pwd = "mypassword"
    # ... or you can make use of the TURN REST API to get info on one or more
    # TURN services dynamically. This makes use of the proposed standard of
    # such an API (https://tools.ietf.org/html/draft-uberti-behave-turn-rest-00)
    # which is currently available in both rfc5766-turn-server and coturn.
    # You enable this by specifying the address of your TURN REST API backend,
    # the HTTP method to use (GET or POST) and, if required, the API key Janus
    # must provide. Notice that the 'opaque_id' provided via Janus API will be
    # used as the username for a specific PeerConnection by default; if that one
    # is missing, the 'session_id' will be used as the username instead.
    #turn_rest_api = "http://yourbackend.com/path/to/api"
    #turn_rest_api_key = "anyapikeyyoumayhaveset"
    #turn_rest_api_method = "GET"
    # You can also choose which interfaces should be explicitly used by the
    # gateway for the purpose of ICE candidates gathering, thus excluding
    # others that may be available. To do so, use the 'ice_enforce_list'
    # setting and pass it a comma-separated list of interfaces or IP addresses
    # to enforce. This is especially useful if the server hosting the gateway
    # has several interfaces, and you only want a subset to be used. Any of
    # the following examples are valid:
    #     ice_enforce_list = "eth0"
    #     ice_enforce_list = "eth0,eth1"
    #     ice_enforce_list = "eth0,192.168."
    #     ice_enforce_list = "eth0,192.168.0.1"
    # By default, no interface is enforced, meaning Janus will try to use them all.
    #ice_enforce_list = "eth0"
    # In case you don't want to specify specific interfaces to use, but would
    # rather tell Janus to use all the available interfaces except some that
    # you don't want to involve, you can also choose which interfaces or IP
    # addresses should be excluded and ignored by the gateway for the purpose
    # of ICE candidates gathering. To do so, use the 'ice_ignore_list' setting
    # and pass it a comma-separated list of interfaces or IP addresses to
    # ignore. This is especially useful if the server hosting the gateway
    # has several interfaces you already know will not be used or will simply
    # always slow down ICE (e.g., virtual interfaces created by VMware).
    # Partial strings are supported, which means that any of the following
    # examples are valid:
    #     ice_ignore_list = "vmnet8,192.168.0.1,10.0.0.1"
    #     ice_ignore_list = "vmnet,192.168."
    # Just beware that the ICE ignore list is not used if an enforce list
    # has been configured. By default, Janus ignores all interfaces whose
    # name starts with 'vmnet', to skip VMware interfaces:
    ice_ignore_list = "vmnet"
    # In case you want to allow Janus to start even if the configured STUN or TURN
    # server is unreachable, you can set 'ignore_unreachable_ice_server' to true.
    # WARNING: We do not recommend to ignore reachability problems, particularly
    # if you run Janus in the cloud. Before enabling this flag, make sure your
    # system is correctly configured and Janus starts after the network layer of
    # your machine is ready. Note that Linux distributions offer such directives.
    # You could use the following directive in systemd: 'After=network-online.target'
    # https://www.freedesktop.org/software/systemd/man/systemd.unit.html#Before=
    #ignore_unreachable_ice_server = true
}
위에서 Stun Server와 Port에 대해서 설정하는 부분들이 있는데 구글에서 제공하는 공용 STUN 서버를 설정해두었다.
이제 기본적인 설정을 마쳤으니 다음 설정으로 넘어가보자.
HTTP를 통해 Request를 보낼 때 사용되는 설정에 대한 정보를 담은 janus.transport.http.jcfg파일을 보자.
해당 파일에서 우리가 설정할 부분은 Admin에 대한 부분을 허용하는 것이다.
admin: {
    admin_base_path = "/admin"            # Base path to bind to in the admin/monitor web server (plain HTTP only)
    admin_http = true                    # Whether to enable the plain HTTP interface
    admin_port = 7088                    # Admin/monitor web server HTTP port
    #admin_interface = "eth0"            # Whether we should bind this server to a specific interface only
    #admin_ip = "192.168.0.1"            # Whether we should bind this server to a specific IP address (v4 or v6) only
    admin_https = false                    # Whether to enable HTTPS (default=false)
    #admin_secure_port = 7889            # Admin/monitor web server HTTPS port, if enabled
    #admin_secure_interface = "eth0"    # Whether we should bind this server to a specific interface only
    #admin_secure_ip = "192.168.0.1        # Whether we should bind this server to a specific IP address (v4 or v6) only
    #admin_acl = "127.,192.168.0."        # Only allow requests coming from this comma separated list of addresses
}
위와 같이 admin에 대한 설정을 진행하는 부분을 찾을 수 있는데 여기서 admin_http를 false에서 true로 바꾸어주면 된다.
이외에도 추가적으로 필요한 HTTP 설정이 있다면 설정해주면 된다.
지금까지 진행하면서 꼭 필요하다는 설정만을 설명하였다. (현재 제 프로젝트에 맞게 주관적으로 설정하였습니다!)
물론 VideoRoom을 사용하기에 VideoRoom 관련 설정에 들어가 Default VideoRoom에 대한 설정을 바꿀 수 있으나 굳이 Default VideoRoom을 사용하지 않을 예정이기에 따로 설정하지 않았다.
만약 VIdeoRoom을 제외하고 추가적인 Plugin을 사용해 필요한 설정이 생긴다면 해당 부분에 대한 설정을 진행하면 된다.
이외에도 추가적으로 필요한 설정들이 있다면 간단하게 마운팅해서 사용하면 된다.
필요한 Sample 파일들은 다음 Git에 있다. (janus-gateway/conf at master · meetecho/janus-gateway (github.com))
이를 Docker로 이용해 실행하면 미디어 서버가 켜진다.
Janus Demo 서비스
이를 실제로 사용해보기 위한 데모 웹페이지를 Janus에서 제공한다. (janus-gateway/html at master · meetecho/janus-gateway (github.com))
다음과 같이 도커로 html을 Apache를 통해 같이 실행시켜주면 된다.
version: "3.8"
services:
  janus-gateway:
    image: 'canyan/janus-gateway:latest'
    command: [ "/usr/local/bin/janus", "-F", "/usr/local/etc/janus" ]
    ports:
      - "8088:8088"
      - "8945:8089"
      - "8946:8889"
      - "8000:8000"
      - "7088:7088"
      - "7089:7089"
    volumes:
      - "./janus/janus.jcfg:/usr/local/etc/janus/janus.jcfg"
      - "./janus/janus.eventhandler.sampleevh.jcfg:/usr/local/etc/janus/janus.eventhandler.sampleevh.jcfg"
      - "./janus/janus.transport.http.jcfg:/usr/local/etc/janus/janus.transport.http.jcfg"

  web_server:
    user: "root"
    image: httpd:alpine
    ports:
        - 80:80
    volumes:
        - ./html:/usr/local/apache2/htdocs
위의 부분은 도커로 이미 설명을 진행했던 부분이고 아래 web_server container을 살펴보자.
단순 httpd 이미지를 받아와 80포트로 실행해준다.
볼륨 마운팅을 진행하는 부분에 있어서 위의 링크에서 받아온 html 폴더를 docker-compose.yml 파일 경로를 기준으로 ./html에 담아두면 된다.
이제 실제로 실행시키면 된다.
실행하는 명령어는 다음과 같다.
docker-compose up --build -d- docker-compose를 실행하는데 이미지를 새로 빌드하고 백그라운드 실행으로 실행시킨다.
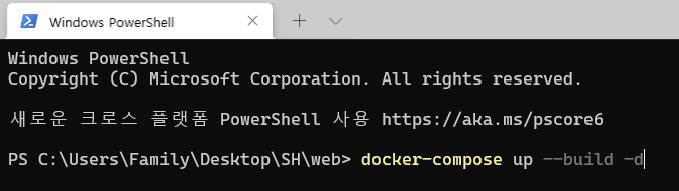
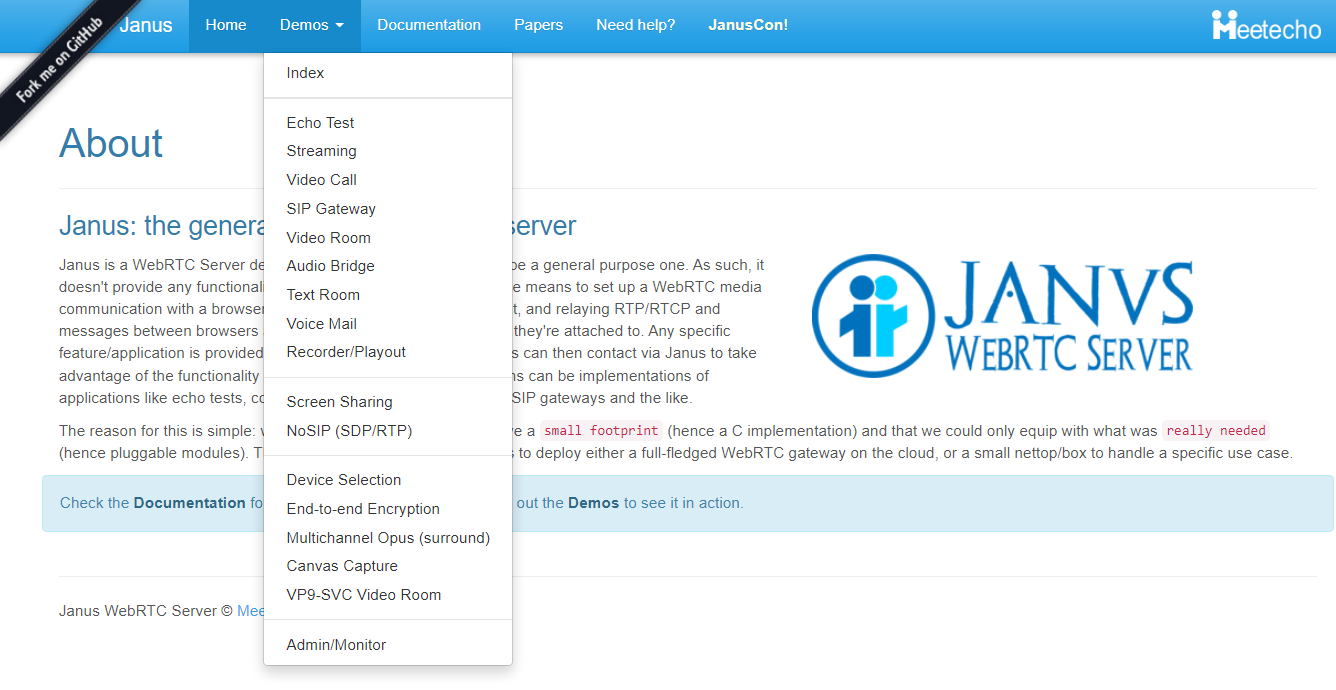
위의 사진과 같이 실제로 실행하면 http://locahost/에 접속하게 되면 다음과 같은 화면을 마주할 수 있다.
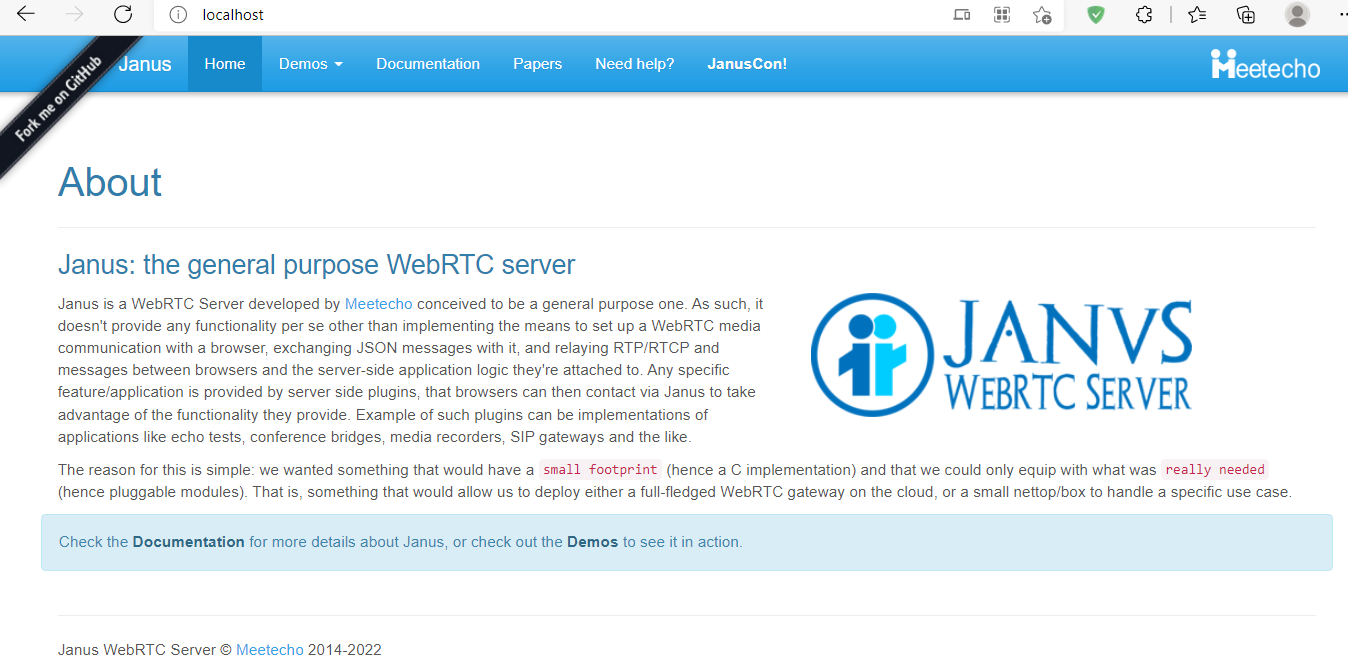
실제로 Demo로 실행해보려면 아래 사진과 같이 네비게이션 메뉴에서 원하는 Plugin을 선택하고 실험해보면 된다.
정리
지금까지 Janus가 어떤 구조로 어떻게 동작하는지에 간단하게 알아보았다.
이제 실제로 데모 웹페이지가 아니라 Customzing한 화상 회의를 구성해보려고 한다.
그 전에 Janus가 어떻게 API를 제공하는지에 대해서 알아야 우리가 해당 부분을 사용할 수 있기 때문에 이에 대한 부분을 다루는 포스트를 작성하려고 한다.
'개발일지' 카테고리의 다른 글
| [WebRTC] Janus를 활용해 화상회의 만들기(Spring편) - (1) (0) | 2022.02.12 |
|---|---|
| [WebRTC] Janus REST API 활용법 (0) | 2022.02.10 |
| [Junit5] Static Method Mocking (0) | 2022.02.08 |
| [WebRTC] WebRTC의 다양한 방식들 (Mesh, SFU, MCU) (0) | 2022.02.07 |
| [Web RTC] Web RTC란? (0) | 2022.02.04 |