오늘은 Spring에서 제공하는 프레임워크 중 보안 프레임워크인 Security에 대해서 다뤄보려고한다.
이번 포스트에서는 Form Login에 관해 다뤄보려고한다.
먼저 들어가기에 앞서 Spring Security에 대해 간단하게 알아보자.
우리는 대부분의 시스템에서 회원의 정보를 관리한다. (아이디, 비밀번호)
예를 들어, 로그인을 진행할 때 해당 아이디가 우리 회원이 맞고 본인이 맞는지 혹은 해당 회원이 어떤 부분에 대해 접근할 권한이 있는지를 확인하는 등의 경우이다.
Spring Security에서는 위에서 설명한 부분을 제공한다!
- 인증(Authorizatoin) : 우리 회원이 맞고 본인이 맞는지
- 인가(Authentication) : 접근할 권한이 있는지
Security는 기본적으로 인증 절차를 거친 후에 인가 절차를 진행하게 되며, 인가 과정에서 해당 리소스에 대한 접근 권한이 있는지 확인한다.
Spring Security는 아이디(Principal), 비밀번호(Credential)를 기준으로 인증을 진행하고 역할(Role)을 기준으로 인가를 진행한다.
이제 실제로 어떻게 동작하는지 알아보자.
FilterChainProxy
Spring Security는 Filter에 흐름에 따라 이를 처리한다.
Filter는 Dispatcher Servlet으로 들어오기 전에 처리되는 부분이다.
구조는 다음 그림과 같이 이루어진다.
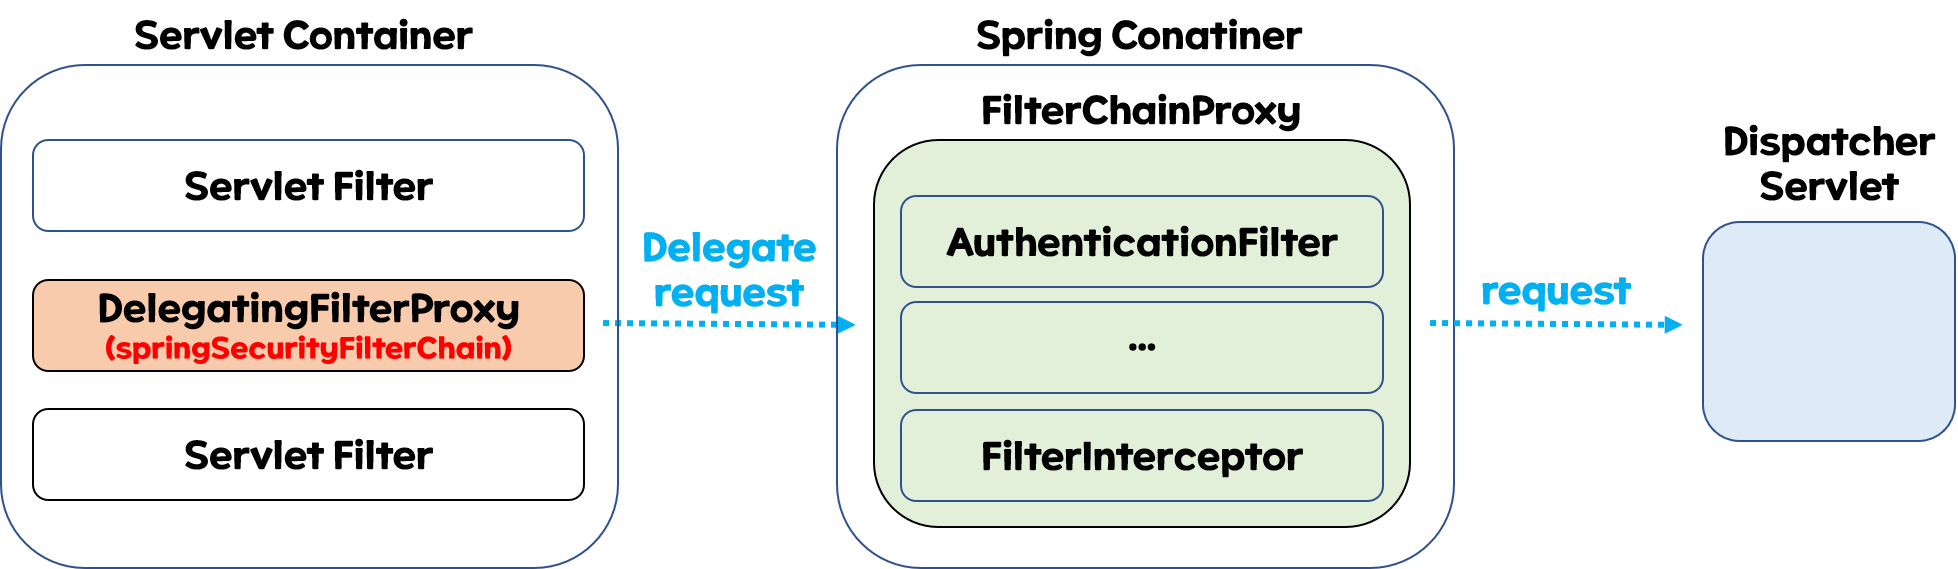
보통 WAS에서 요청을 받아서 Servlet Filter를 통해 DispatcherServlet에 전달하고 응답을 받고 클라이언트에 받는 순으로 진행됐다.
Servlet Filter는 스프링에서 정의된 빈을 주입해서 사용할 수 없어 이를 해결하기 위해 DelegatingFilterProxy를 사용한다.
DelegatingFilterProxy는 미리 springSecurityFilterChain 이라는 이름으로 생성된 빈을 등록해놓고 이 빈에 위임을 요청한다.
즉, 클라이언트언트로부터 요청이 오면 그 요청은 WAS내에 있는 DelegatingFilterProxy가 springSecurityFilterChain이라는 이름을 가진 빈을 찾아 해당 역할을 수행하게끔 위임하는 것이다.
여기서 말하는 springSecurityFilterChain이라는 이름을 가진 빈이 바로 FilterChainProxy이다.
FilterChainProxy는 요청을 위임받고 실제로 보안 처리를 진행한다.
이 FilterChainProxy는 Spring Security 초기화 시 생성되는 여러가지 필터들을 관리하고 제어한다.
우리는 이 FilterChainProxy를 입맛에 맞게 설정하기 위해 다음과 같은 Configuration을 설정한다.
@Configuration
@EnableWebSecurity
public class SecurityConfig extends WebSecurityConfigurerAdapter {
    @Override
    protected void configure(HttpSecurity http) throws Exception {
        ...
    }
}
우리는 위와 같이 WebSecurityConfigurerAdapter를 상속하여 SecurityConfig를 생성한다.
이는 HttpSecurity를 생성하게 되고 WebSecurity를 거쳐 FilterChainProxy로 전달되게된다.
그렇다면, 실제 Form으로 로그인을 진행할 때 어떤 흐름으로 진행하는지에 대해 알아보자.
FilterChainProxy로 요청이 들어왔다.
먼저, 해당 요청에 대해 세션을 확인하여 있다면 SecurityContextHolder에 Authentication을 담고있는 SecurityContext를 담아준다.
그렇다면 여기서 말하는 SecurityContextHolder, SecurityContext, Authentication이 뭔지 알아보자.
SecurityContextHolder, SecurityContext, Authentication
Authentication
public interface Authentication extends Principal, Serializable {
    Collection<? extends GrantedAuthority> getAuthorities();

    Object getCredentials();

    Object getDetails();

    Object getPrincipal();

    boolean isAuthenticated();

    void setAuthenticated(boolean var1) throws IllegalArgumentException;
}- 우리가 현재 접근하는 주체의 정보와 권한을 담는 인터페이스이다.
- 주체의 정보로는 아이디(Principal), 비밀번호(Credential)이 있다.
- 권한으로는 Authority가 있다.
SecurityContext
- Authentication을 보관하는 역할을 한다.
- SecurityContext를 통해 Authentication 객체를 꺼내올 수 있다.
- ThreadLocal로 공유된다. (같은 쓰레드 내에서 공유할 수 있다.)
SecurityContextHolder
- 보안 주체의 세부 정보를 포함하여 응용프로그램의 현재 보안 컨텍스트에 대한 세부 정보가 저장된다.
- 다음의 3가지의 기본 공유전략을 사용한다.
- MODE_THREADLOCAL
- ThreadLocal을 사용하여 SecurityContext를 공유한다.
- 기본 설정이다.
- MODE_INHERITABLETHREADLOCAL
- 자식 쓰레드가 부모 쓰레드의 자원을 공유 받는다.
- MODE_GLOBAL
- static 선언하여 SecurityContext를 저장한다.
- JVM 내의 인스턴스들은 모두 공유가 가능하다.
- MODE_THREADLOCAL
Security는 이를 가지고 실제로 인증이 된 객체에 대해 세션으로 유지하여 추가적으로 인증을 받지 않을 수 있게 도와준다.
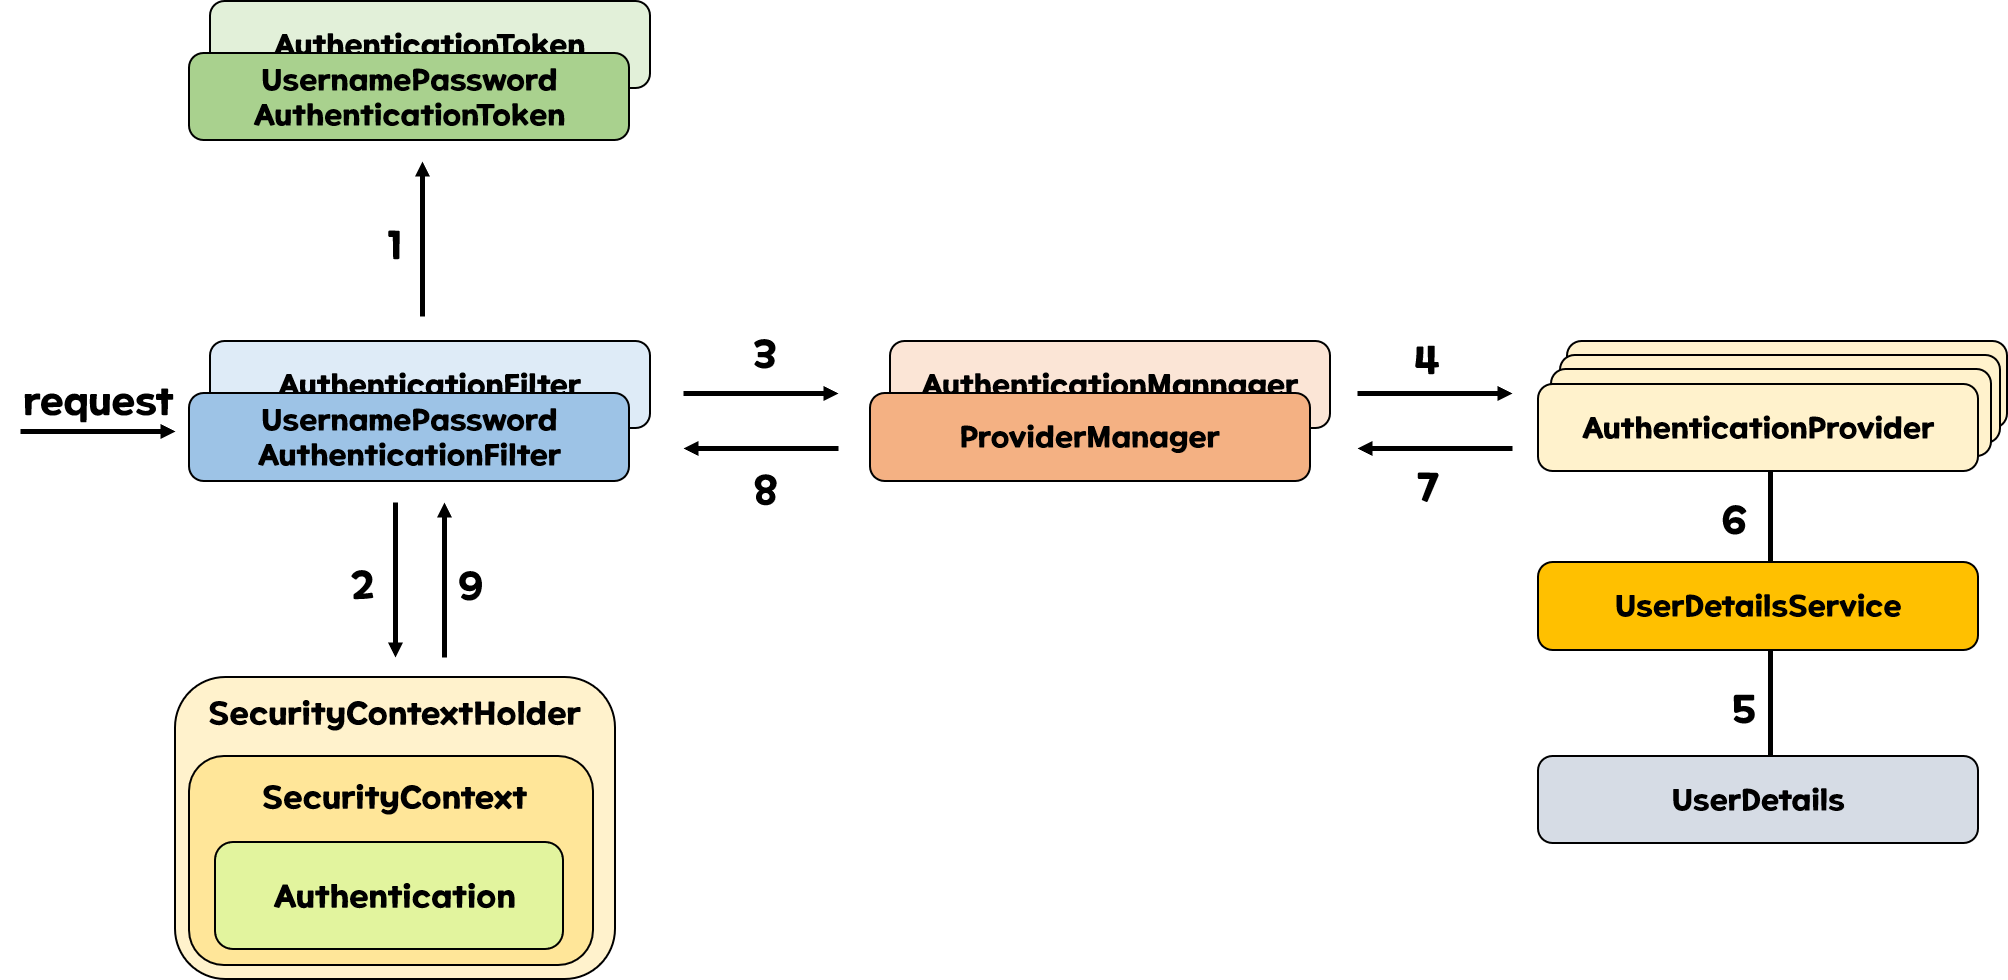
만약 세션을 확인하였는데 아무것도 없다면 SecurityContextHolder에 null을 담게 되고 실제로 인증을 위한 작업을 준비하기 위해 AuthenticationFilter를 호출한다.
AuthenticationFilter
폼 로그인을 사용할 때는 AuthenticationFilter의 구현체로 UsernamePasswordAuthenticationFilter를 사용한다.
우리는 인증을 진행하기 전에 우리가 폼을 통해 입력한 아이디, 비밀번호를 인증 객체로 만들어준다.
인증 객체라는 것은 위에서 언급한 Authentication 객체로 UsernamePasswordAuthenticationToken을 구현체로 사용하게 된다.
public class UsernamePasswordAuthenticationToken extends AbstractAuthenticationToken {
    private static final long serialVersionUID = 550L;
    private final Object principal;
    private Object credentials;

    public UsernamePasswordAuthenticationToken(Object principal, Object credentials) {
        super((Collection)null);
        this.principal = principal;
        this.credentials = credentials;
        this.setAuthenticated(false);
    }

    public UsernamePasswordAuthenticationToken(Object principal, Object credentials, Collection<? extends GrantedAuthority> authorities) {
        super(authorities);
        this.principal = principal;
        this.credentials = credentials;
        super.setAuthenticated(true);
    }

    ...
}
위에서 볼 수 있듯이, 첫 번째 생성자를 통해서 아이디를 Principal로, 비밀번호를 Credentials로 하여 인증 객체를 생성한다.
인증이 실제로 완료되게 되면 두 번쨰 생성자를 통해 토큰을 새로 발급하여 이를 SecurityContextHolder에 저장하는데 이 부분은 추후에도 설명할 것이다.
인증 객체가 만들어지면 이 인증 객체를 가지고 AuthenticationManager를 호출하여 인증을 진행하게 된다.
AuthenticationManager은 ProviderManger를 구현체로 진행하게 된다.
AuthenticationManger
위에서 AuthenticationManager를 통해 실제로 인증을 진행한다고는 했으나 실제로 처리하는 것은 AuthenticationManger가 아니다.
실제로는 여러 개의 AuthentivationProvider를 리스트로 등록해둔다.
그리고, while문을 통해 해당 리스트를 모두 조회하면서 해당 요청을 처리할 수 있는 Provider를 실행하여 진행하게 된다.
public class ProviderManager implements AuthenticationManager, MessageSourceAware, InitializingBean {
    ...

    public Authentication authenticate(Authentication authentication) throws AuthenticationException {
        Class<? extends Authentication> toTest = authentication.getClass();
        AuthenticationException lastException = null;
        AuthenticationException parentException = null;
        Authentication result = null;
        Authentication parentResult = null;
        int currentPosition = 0;
        int size = this.providers.size();
        Iterator var9 = this.getProviders().iterator();

        // Provider 탐색
        while(var9.hasNext()) {
            AuthenticationProvider provider = (AuthenticationProvider)var9.next();
            if (provider.supports(toTest)) {
                if (logger.isTraceEnabled()) {
                    Log var10000 = logger;
                    String var10002 = provider.getClass().getSimpleName();
                    ++currentPosition;
                    var10000.trace(LogMessage.format("Authenticating request with %s (%d/%d)", var10002, currentPosition, size));
                }

                try {
                    result = provider.authenticate(authentication);
                    if (result != null) {
                        this.copyDetails(authentication, result);
                        break;
                    }
                } catch (InternalAuthenticationServiceException | AccountStatusException var14) {
                    this.prepareException(var14, authentication);
                    throw var14;
                } catch (AuthenticationException var15) {
                    lastException = var15;
                }
            }
        }

        // 결과 처리
        if (result == null && this.parent != null) {
            try {
                parentResult = this.parent.authenticate(authentication);
                result = parentResult;
            } catch (ProviderNotFoundException var12) {
            } catch (AuthenticationException var13) {
                parentException = var13;
                lastException = var13;
            }
        }

        if (result != null) {
            if (this.eraseCredentialsAfterAuthentication && result instanceof CredentialsContainer) {
                ((CredentialsContainer)result).eraseCredentials();
            }

            if (parentResult == null) {
                this.eventPublisher.publishAuthenticationSuccess(result);
            }

            return result;
        } else {
            if (lastException == null) {
                lastException = new ProviderNotFoundException(this.messages.getMessage("ProviderManager.providerNotFound", new Object[]{toTest.getName()}, "No AuthenticationProvider found for {0}"));
            }

            if (parentException == null) {
                this.prepareException((AuthenticationException)lastException, authentication);
            }

            throw lastException;
        }
    }

    ...
}
위에서 볼 수 있듯이, var9에 Provider Iterator를 담아 이를 돌리면서 실제로 진행해본다.
그리고 오류가 발생하면 Exception을 발생하는 모습을 확인할 수 있다.
실제로 Form 로그인을 처리할 때는 DaoAuthenticationProvider이 실행되어 이를 처리한다.
DaoAuthenticationProvider 내부에서는 UserDetailsService를 통해 데이터베이스에서 꺼내온 UserDetails 객체와 우리가 입력한 Authentication 객체를 비교하여 인증에 성패를 결정한다.
UserDetails, UserDetailsService
UserDetailsService 인터페이스는 UserDetails 객체를 반환하는 하나의 메소드를 가지고 있다.
이는 우리가 보통 데이터 베이스와 연결하여 해당 인증 객체와 동일한 객체를 꺼내와 이를 UserDetails 객체로 만들어준다.
UserDetails 객체는 다음과 같다.
public interface UserDetails extends Serializable {
    Collection<? extends GrantedAuthority> getAuthorities();

    String getPassword();

    String getUsername();

    boolean isAccountNonExpired();

    boolean isAccountNonLocked();

    boolean isCredentialsNonExpired();

    boolean isEnabled();
}
위와 같이 UserDetails는 Authentication 객체와 비슷하게 아이디 비밀번호를 가지고 있다.
public interface UserDetailsService {
    UserDetails loadUserByUsername(String var1) throws UsernameNotFoundException;
}
위와 같이 UserDetailsService는 입력한 객체에 대한 아이디를 가진 회원에 대한 정보를 DB에서 꺼내와 UserDetails를 생성한다.
Provider에서는 둘을 비교하여 성패의 여부를 AuthenticationManager에 전달한다.
여기서, 둘을 비교하는데 있어서는 PasswordEncoder을 활용한다.
데이터베이스에 실제로 저장되어있을 때, 회원의 비밀번호가 노출되면 안되므로 인코딩되어 저장되는데 이 역할을 수행해주는게 PasswordEncoder이다.
간단하게 다음과 같이 선언할 수 있다.
PasswordEncoderFactories.createDelegatingPasswordEncoder();그리고 비교를 위해 다음과 같이 간단하게 사용할 수 있다.
passwordEncoder.matches(password, memberDetail.getPassword())그리고 비교를 완료하고 전달된 결과를 AuthenticationManager로 전달한다.
전달된 결과에 따라 AuthenticationManager은 Authentication을 SecurityContext에 담고 SecurityContextHolder에 담는다.
추후에 이는 SecurityContextPersistenceFilter에서 다시 세션에 저장해두어 위의 과정이 반복될 수 있도록 한다.
'스프링' 카테고리의 다른 글
| [Security] Authorization(Security Form Login 구현) (0) | 2021.10.27 |
|---|---|
| [Security] Authentication(Security Form Login 구현) (1) | 2021.10.26 |
| [JPA] 다대다(N:M) 관계 매핑, 좋아요 기능 구현 (3) | 2021.10.24 |
| [JPA] 일반 조인 vs 패치 조인 (0) | 2021.10.23 |
| [Querydsl] Querydsl 기본적인 사용 및 게시물 동적 검색 구현 (5) | 2021.10.21 |